Overview
CodeCampX is a personal manager application for Coding BootCamp manager. The user interacts with it via a Command Line Interface (CLI) along with a Graphical User Interface (GUI) created with JavaFX. The application is written in Java.
Summary of contributions
-
Major enhancement: Implement Staff of CodeCampX
-
What it does: Staff is one of the major classes in CodeCampX. It represents all the Staffs or employees in CodeCampX. There are two type of Staff differentiated by permission Level: teacher and admin. Only a Teacher Staff can teach a course. Moreover, making a payment for Teacher Staff for teaching a course is supported.
-
Justification: Name and details of the payment is auto recorded based on information of the salary and the course that teacher staff is teaching (implemented by ShengXue). Teacher can be assign and unassigned to a course (implemented by Ivan). For internal employee management purpose, it is more desirable to make Staff class holds many identity and data fields (more than student). However, for user’s convenience, it is not always the case that user has all the information about a Staff when adding him, so it is optional for the user to specify these information. These information are viewable in Staff Tab.
-
Highlights: With permission level, it is very easy to implement Teacher and Admin, which seems to be two different classes, with just one time implementation for Staff class. This also simplifies work for AddressBook Storage and Managers when they only have to work with one class instead of two.
-
-
Major enhancement: Extended Refer Object by ID of CodeCampX
-
What it does: Let user select and refer an Object in CodeCampX by ID instead of Index for selecting and tracking information of the object.
-
Justification: This implementation is essential for the user to refer, select, modify objects and manage their entities links among themselves. Whenever the user delete an object, he/she would want to track all the entities link connections associated with this object and delete them. Referring by ID can help track and manage entities link easily since many classes have 1-to-1 relationship with each other. If the user want to delete a student, he or she can key in student’s ID. All the objects storing this student’s ID will remove it; thus, all the entities connection are broken. This ensure consistency of all the objects whenever user use a CRUD command. Teachers can now easily see which students have not submitted and chase them for their work without having to count one by one to find the missing submission. Furthermore, being able to refer by ID can help user identify correctly and keep track of each object. In AB3, each person is selected by its index. However, CodeCampX is much more complicating with multiple classes and relationships. Whenever a CRUD operation execute, indexes of objects are subjected to change. Referring by index cannot support well in this scenario.
-
Highlights: Getting object from model now becomes extremely easy when we just need to specify ID number and Entity Type of the object. Similarly for finding and setting objects.
-
-
Minor enhancement: Extended UndoableCommand for Add, Delete and Edit command
-
What it does: Follow up UndoableCommand implementation of Developer Le Trung Hieu, extends the functionality of UndoableCommand to Add, Delete and Edit Command. Add, Delete and Edit command can be undo and redo sequentially.
-
Justification: Refactoring AddCommand, DeleteCommand and EditCommand from extending Command to extending from UndoableCommand. In each command, override preprocessUndoableCommand() method and generateOppositeCommand() method corresponding to characteristic and functionality in each of these commands. For AddCommand, opposite command is DeleteCommand and vice verse. For Edit Command, opposite command is still Edit Command but edited Object is the original object itself.
-
Highlights: This enhancement improved CodeCampX interaction and convenience a lot since user can undo and redo most of the commands.
-
-
Code contributed: [Functional and Test Code]
-
Other contributions:
Contributions to the User Guide
User Guide Contribution |
Assigning/Unassigning -TYPE- to a Course : assign or unassign respectively
Assign a Student to a Course : assign or unassign respectively
Adds the Student ID to the Course ID specified.
Format: assign cid/COURSEID sid/STUDENTID
Example: assign cid/829 sid/33
Removes the Student ID from the Course ID specified.
Format: unassign cid/COURSEID sid/STUDENTID
Example: unassign cid/829 sid/33
|
When a student is assigned to a course, a progress will be created for the student for every assignment of the course. This progress tracks whether the student has completed the specific assignment (Done) or not (Not Done) |
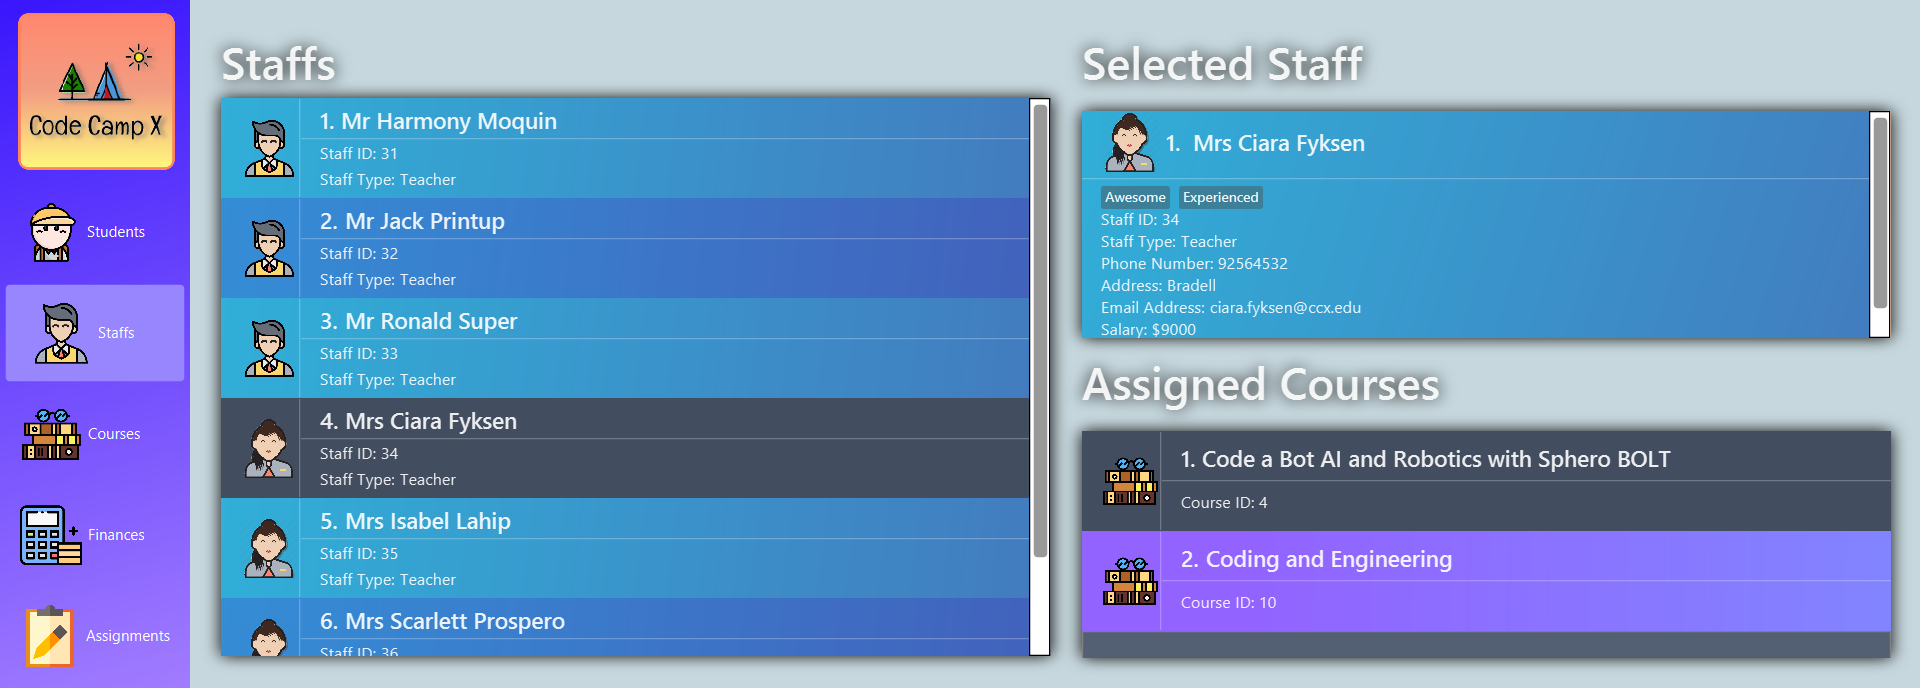
In Student Tab, Under Selected Student and Assigned Courses Panel, after assigning student to course, it can be seen that the progresses have been added for every assignment in the course. The Student’s progresses can be tracked by specific assignment status Done/ Not done. Total done progresses can be viewed under "Number of progress done" field.
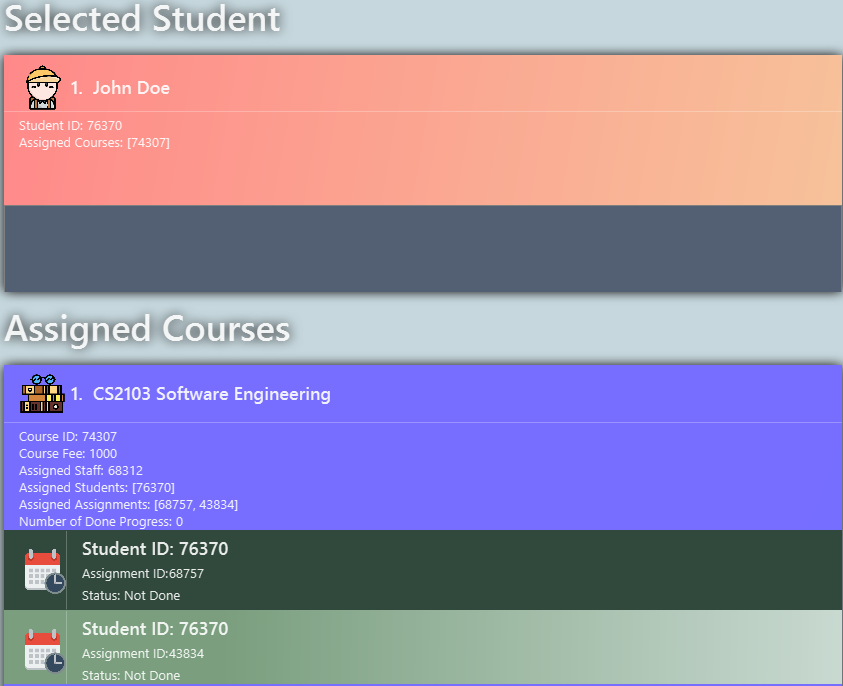
Student’s details and Assigned Assignments for this courses can also be viewed under Course Tab.

assign/unassign Teacher to/from a Course
Adds the Teacher ID to the Course ID specified.
Format: assign cid/COURSEID tid/TEACHERID
Example: assign cid/829 tid/21
When a teacher is assigned to a course, the teacher’s ID is added to course and course’s ID is added to teacher. In Selected Staff Tab, it can be seen that a course ID is added under "Assigned Courses" and the course can be viewed in Assigned Courses Tab.
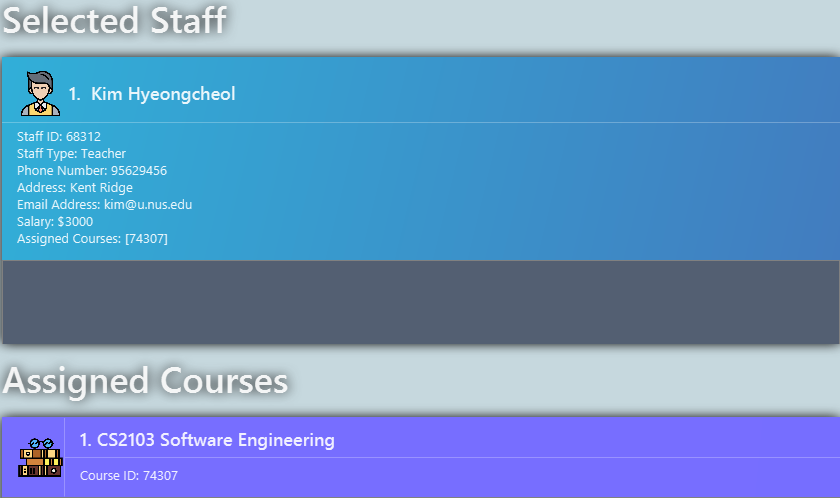
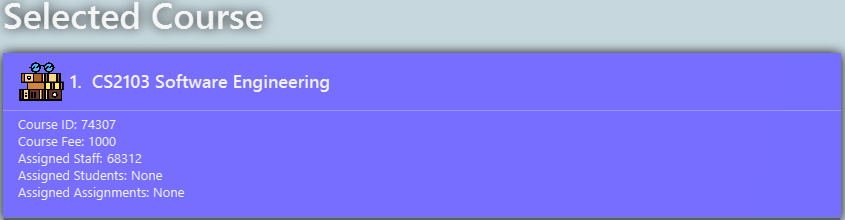
In Selected Course Tab, it can be seen that a staff ID is added under "Assigned Staff".
Removes the Teacher ID from the Course ID specified.
Format: unassign cid/COURSEID tid/TEACHERID
Example: unassign cid/829 tid/21
When a teacher is unassigned to a course, the teacher’s ID is removed from course and course’s ID is removed from teacher. In Selected Staff Tab, after unassign Command, the course’s ID and details no longer appears.
Clearing all the data
Coding Camp book data can be cleared by clear-all command. This action will CLEAR all the entire address book and
this action can not undone.
|
This will irrevocably clear the entire address book and you cannot undo it! Be very careful with this command. |
Staff
Add a staff: add-staff
Add a new staff to the list of staff
Format: add-staff n/NAME lvl/LEVEL g/GENDER p/PHONE e/EMAIL s/SALARY a/ADDRESS [t/TAG]…
Example:
* add-staff n/Bob Ross lvl/teacher g/m p/98765432 e/bob.ross@gmail.com s/1000 a/311, Clementi Ave 2, #02-25 t/LovesArt t/Friendly
|
The lvl of the staff refers to the Staff Type. It can only be
specified as |
|
The Gender of the Staff is shown in the form of a little icon
on the left. This automatically updates when you |
Remove a staff: delete-staff
Remove a staff from the list of staffs
Format: delete-staff ID
Example:
-
delete-staff 16100
|
Be reminded that when you delete a staff that is of staff type: Teacher, the teacher will be deleted from every course as well. |
Locating items by name: find-staff
Finds staff whose names contain any of the given keywords.
Format: find-staff KEYWORD [MORE_KEYWORDS]…
Examples:
-
find-staff Ned
ReturnsnedandNed Stark -
find-staff Lannister Targaryen Stark
Returns any staffs having namesLannister,Targaryen, orStark
List all staffs: list-staff
Shows a list of all staffs
Format: list-staff
Edit information about a staff: edit-staff
Edits an existing staff in the staff list
Format: edit-staff ID [n/NAME] [g/GENDER] [p/PHONE] [e/EMAIL] [s/SALARY] [a/ADDRESS] [t/TAG]…
Example:
-
edit-staff 16100 n/Aegon Targaryen t/legend
|
You only can edit Name, Gender, Phone, Email, Salary, Address and Tags of a Staff. If you edit a salary of a Teacher Staff, all the Finance associated with him still remain the same. This is because a Finance is added based on the salary of a Teacher at that moment and it records the transaction made. If a Teacher Staff’s salary is edited (for example: increased), it means this Teacher’s salary base is increased and it has nothing to do with the Finances that has been made. |
Contributions to the Developer Guide
Developer Guide Contribution |
In EditCommand class, method preprocessUndoableCommand to get the toEdit Object and edited Object.
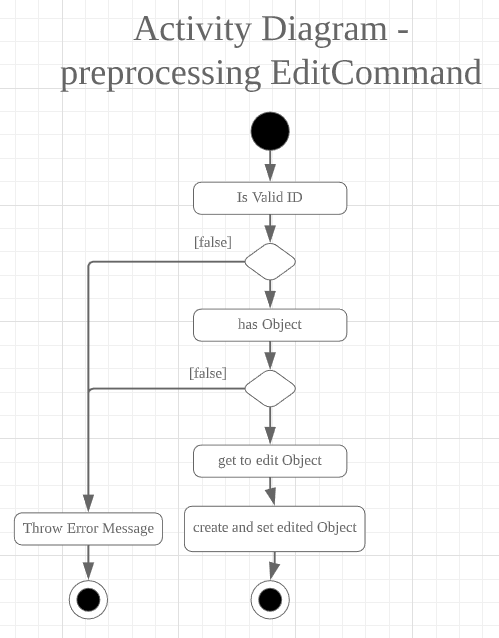
Method executeUndoableCommand will set the toEdit Object in the ObjectAddressBook to the edited Object.
Method generateOppositeCommand() will generate another EditCommand (which
is opposite to this EditCommand) with editing information of the original toEdit Object and push it to undoStack.
When undo and redo commands are executed, the process is carried out as described above.
This feature is implemented with the main classes - Staff, with a permission level specifying Teacher and Admin.
public class Staff extends ModelObject {
    public enum Level {
        TEACHER,
        ADMIN
    }
    //...
}
One of the features is to display all the courses that a teacher is teaching.
Another feature is to keep track of salary payment for teacher. A teacher is paid by teaching a course and the amount
is taken from the salary of the teacher. The payment will automatically have records of respective course and teacher ID.
To pay for admin, user has to do it manually using miscellaneous FinanceType.
Certain approaches have some certain pros and cons. It depends on how the user want to keep track of payment and method to pay to teacher and admin.
AddCommand and DeleteCommand extends from abstract class UndoableCommand. Thus, user can undo/ redo this command.
In AddCommand class, method preprocessUndoableCommand get the toAdd Object and an index (if available).
Method executeUndoableCommand will add the toAdd Object to the ObjectAddressBook.
Method generateOppositeCommand() will generate a DeleteCommand (which
is opposite to this AddCommand) with toDelete Object is a clone of toAdd Object and push it to undoStack.
In DeleteCommand class, method preprocessUndoableCommand get the toDelete Object and its index.
Method executeUndoableCommand will delete this toDelete Object from the ObjectAddressBook.
Method generateOppositeCommand() will generate an AddCommand (which
is opposite to this DeleteCommand) with toAdd Object is a clone of toDelete Object and push it to undoStack.
When undo and redo commands are executed, the process is carried out as described above.
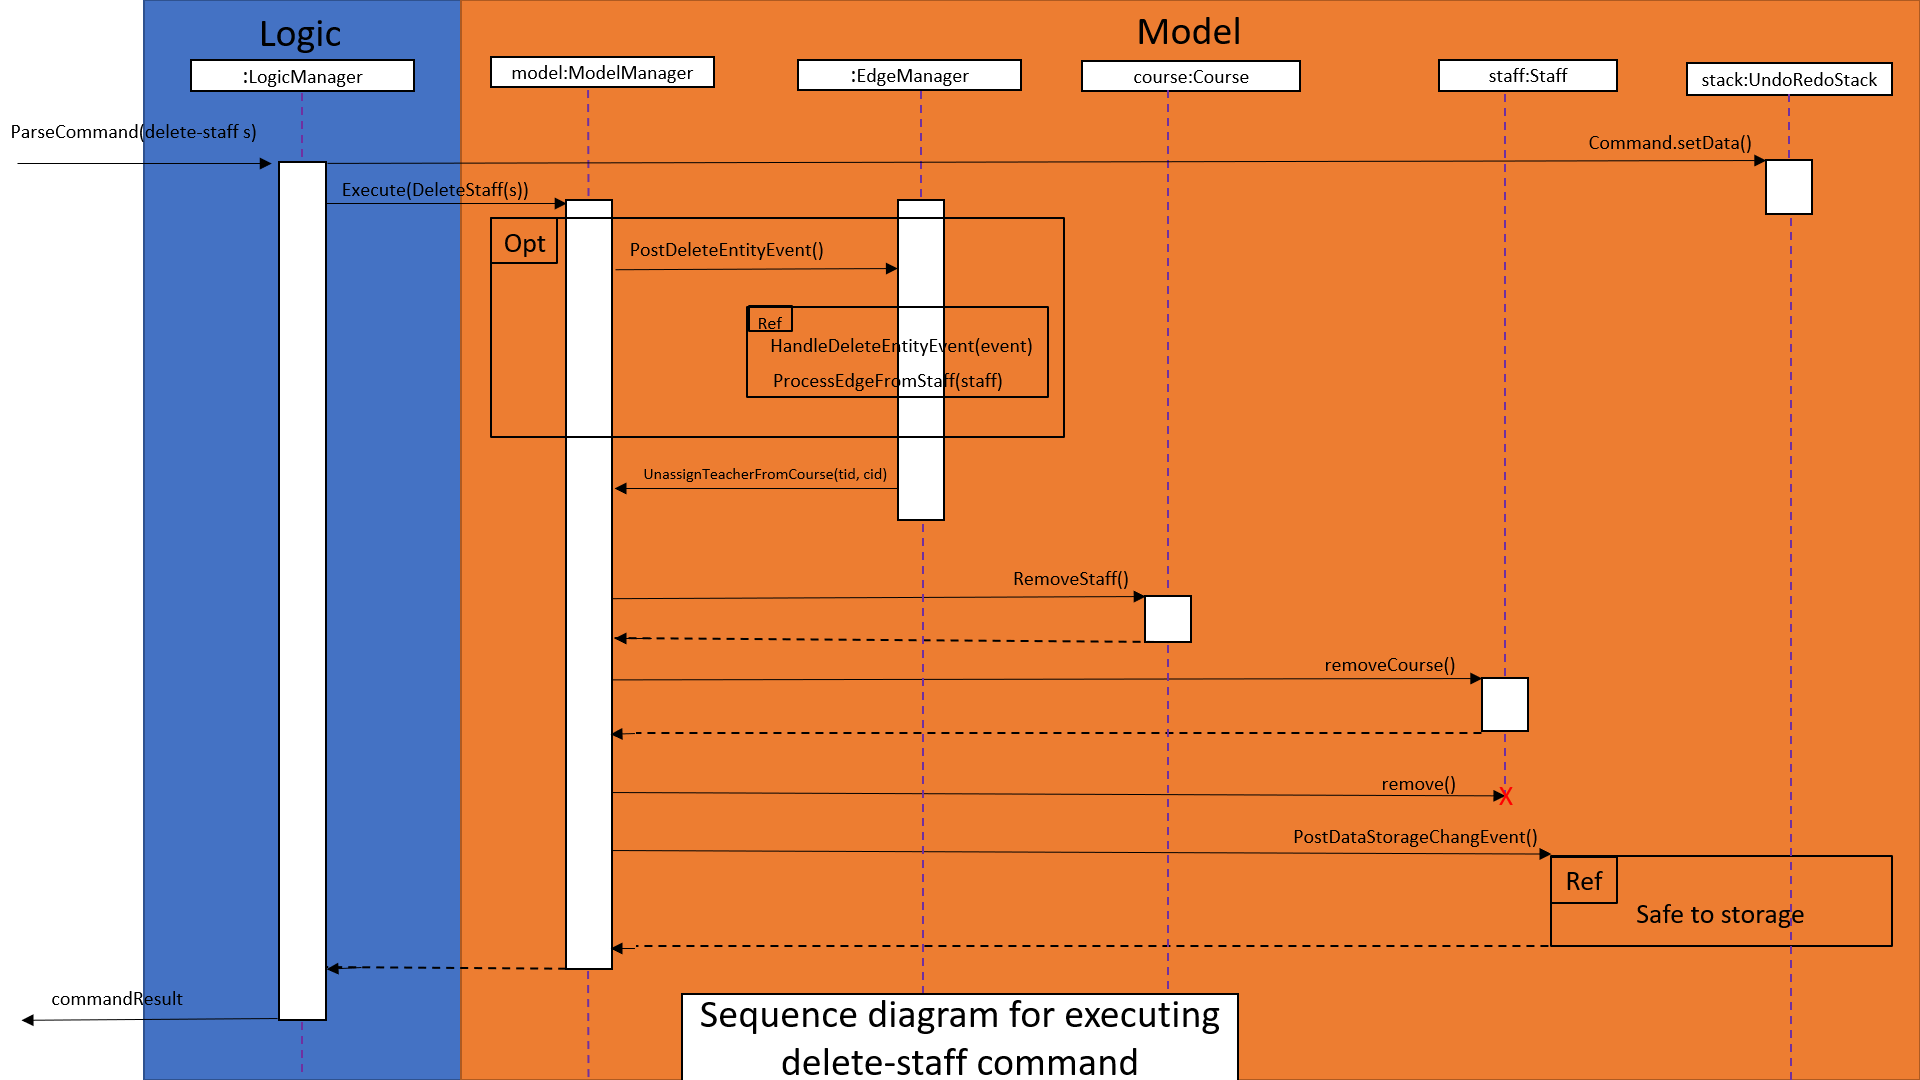
For DeleteCommand, it is important to ensure that entity links are removed properly.
For AddCommand generated by generateOppositeCommand(), it is important to restore all the entity links properly.
Therefore, in order to ensure undo/redo successfully, all 3 managers must be involved to manage all entity links.
When an object is deleted (Student/Teacher/Course/Assignment), EdgeManager will invoke a DeleteEntitySyncEvent
signal and a DataStorageChangeEvent signal to be handled by StorageManager. generateOppositeCommand() will
generate an add-command with a clone object of deleted object and stacked into undoStack.When an undo command is
executed, this add-command is pop out from the stack and executed, adding the cloned object with all the
information of the deleted object. The flow after add-command called now can be generalized as the previous
delete-command. All the entities links are restored.