By: Team CS2103-AY1920S2-CS2103-W14 Since: Jan 2020 Licence: MIT
- 1. Setting up
- 2. Implementation
- 2.1. Unique Identification of Entities [Sim Sheng Xue]
- 2.2. Entity Linking - Assigning/Un-Assigning an Entity to/from a Course [Tee Jun Jie Ivan]
- 2.3. Student Progress Management [Tee Jun Jie Ivan]
- 2.4. Undo/Redo [Hieu]
- 2.5. View Switching [HIEU]
- 2.6. Managing Staff Feature [Dat]
- 2.7. Tracking Miscellaneous Payments/Earnings, Teacher Payments and Student earnings [Sim Sheng Xue]
- 2.8. Navigation among command history in the command box [Sim Sheng Xue]
- 2.9. Logging
- 2.10. Configuration
- 3. Documentation
- 4. Testing
- 5. Dev Ops
- Appendix A: Product Scope
- Appendix B: User Stories
- Appendix C: Use Cases
- Appendix D: Non Functional Requirements
- Appendix E: Glossary
- Appendix F: Product Survey
- Appendix G: Instructions for Manual Testing
- Appendix H: Effort
1. Setting up
Refer to the guide here.
1.1. Architecture [Hieu]
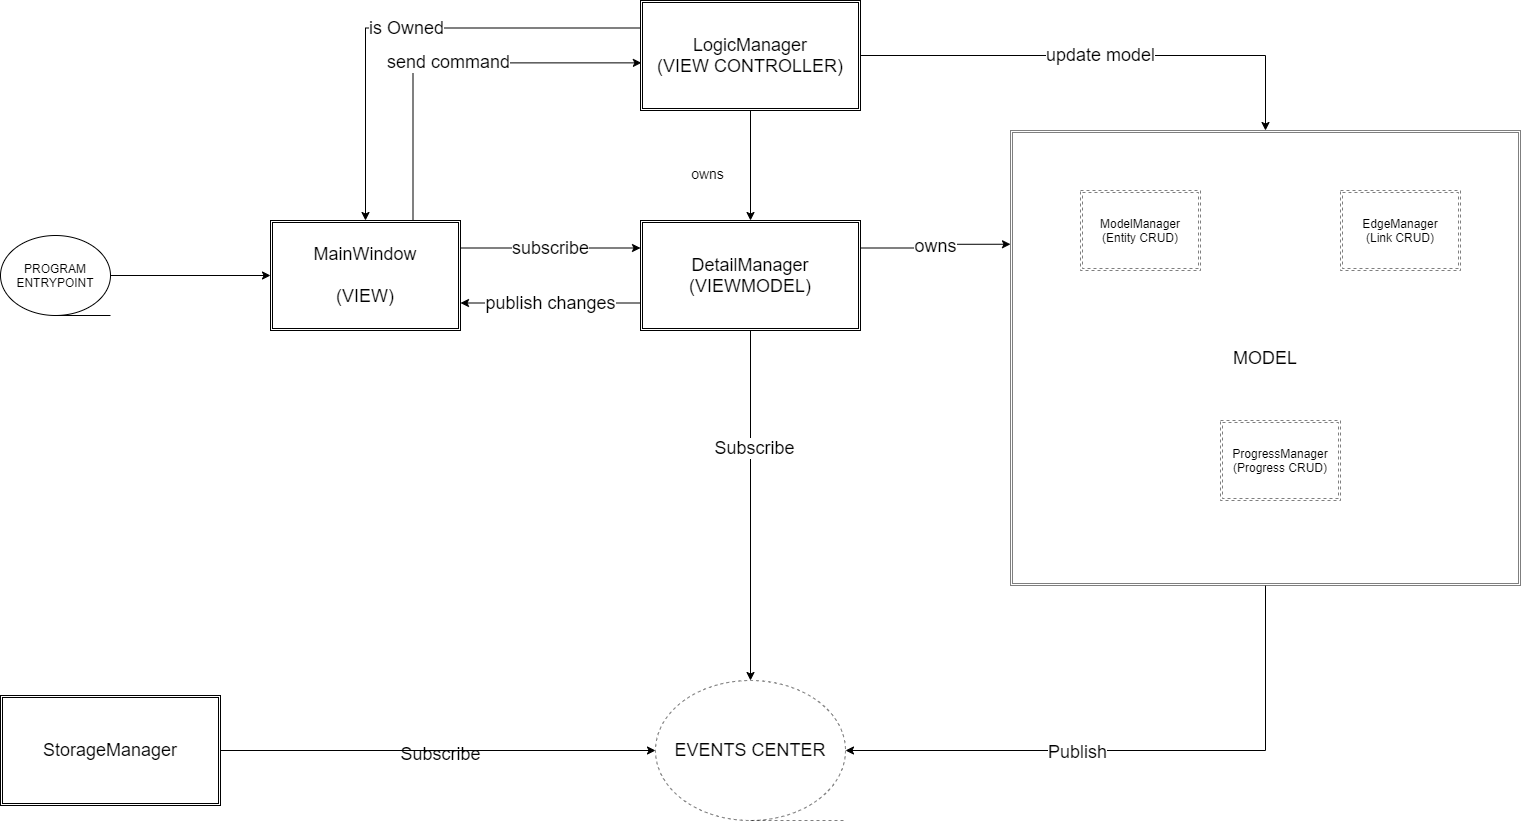
The Architecture Diagram given above explains the high-level design of the App. Given below is a quick overview of each component.
1.1.1. Design Pattern and Control Flow
Two main design patterns were used in the design of our software.
- Model - View - ViewModel (MVVM) Control Flow
-
Design Consideration between Model-View-Controller(MVC) and Model-View-ViewModel(MVVM) design:
-
The original design was a standard MVC, where Controller is our LogicManager, and the Model is our ModelManager. Then components in the view will bind to the model objects, whenever there is an update to the model object the UI view will be updated automatically.
-
However, the more UI custom views logic we decide, we might need to push more and more custom UI-specific logic to our Model and ViewController class, which is not very desirable. Or as the infamous quote, MVC becomes "Massive View Controller".
-
Instead, we will adapt to MVVM design, where ViewModel will hold a list of observableMap of data. Each custom view in our UI will have a one-to-one mapping with an observableMap, and to calculate those observableMap the ViewModel will make use of the Managers we define.
-
- Event-Driven Design
-
We adopt event-driven design, where different components will try to communicate with each other through publishing events and subscribing to events, de-couple between components, and facilitate communication between components a lot.
-
To separate responsibilities well between components, we divide them into multiple managers, all extending from the BaseManager class. The BaseManager will always hold refer to the EventsCenter (which is designed to be a singleton class in our case)
-
One is publishing managers (those in Model section, i.e EdgeManager, ProgressManager, etc). They can post events to the EventsCenterSingleton.
-
The other one is subscribing managers, one is the ViewModel (which is DetailManager) and StorageManager. Subscribing managers will have handler method that listen to the events and decide what to do.
-
-
Different events types will extend from the BaseEvent. In our app we have
-
DataStorageChangeEvent: signals when model object changes
-
DeleteEntitySyncEvent: signals when the entity linking relationship is broken (e.g when a student is deleted, its link to course and progress and teacher, etc will be broken)
-
-
Here is an example of how a command to delete student with ID 1 will invoke different parts along the flow.

-
ViewController(i.e LogicManager) will invoke ModelManager.delete method (Note that ModelManager extends from BaseManager, and has the Publisher capacity)
-
ModelManager will invoke publishing of events to EventsCenterSingleton (which holds an EventBus), in this case postDataStorageChangeEvent and postDeleteEntitySyncEvent will be invoked.
-
Other BaseManagers will also hold this EventsCenterSingleton and listen to new publish events in the event bus. If the manager class has the handler function for that types of events, the method will be invoked.
-
In this case, StorageManager will have handler for both DataStorageChangeEvent and DeleteEntitySyncEvent, while ViewModel will have handler for DataStorageChangeEvent.
1.1.2. Architecture-Level Components
Overall, the App consists of five main components.
-
View: The UI of the App. Represented byUIin our implementation. -
ViewController: The command executor. Represented byLogicin our implementation. -
ViewModel: Updates the model for UI to display. -
Model: Holds the data of the App in-memory. -
Storage: Reads data from, and writes data to, the hard disk.
In addition, Commons represents a collection of classes used by multiple other components.
The following class plays an important role at the architecture level:
-
LogsCenter: Used by many classes to write log messages to the App’s log file.
Each of the five components
-
Defines its API in an
interfacewith the same name as the Component. -
Exposes its functionality using a
{Component Name}Managerclass.
For example, the Logic component (see the class diagram given below) defines it’s API in the Logic.java interface and exposes its functionality using the LogicManager.java class.

How the architecture components interact with each other
The Sequence Diagram below shows how the components interact with each other for the scenario where the user issues the command delete 1.

delete 1 commandThe sections below give more details of each component.
1.2. View/UI component [Sim Sheng Xue]

The UI consists of a MainWindow that is made up of parts e.g.CommandBox, ResultDisplay, StatusBarFooter etc.
All these, including the MainWindow, inherit from the abstract UiPart class.
The UI component uses JavaFx UI framework.
The layout of these UI parts are defined in matching .fxml files that are in the src/main/resources/view folder.
The UI component,
-
Executes user commands using the
ViewControllercomponent. -
Listens for changes to
ViewModeldata so that the UI can be updated with the modified data.ListPanelobjects store a list ofCardobjects.
DetailedPanelobjects store a list ofVeryDetailedCardobjects. For example, for the Student Tab:
The StudentListPanel is the top left panel. This stores a list of StudentCard,
which only displays the basic information about the Student.
The StudentDetailedCard is the top right panel. This is viewed when a specific
Student is selected using a command. This will show the detailed information about
the Student, such as the courses assigned to this Student.
The StudentDetailedPanel is the bottom
right panel. This stores a list of CourseVeryDetailedCard.
Each CourseVeryDetailedCard displays the list of assignments assigned
to the Course of this Student.
Only the Student and Course tabs contain DetailedPanel(bottom right panel). All tabs
contain the ListPanel (top left panel) and DetailedCard(top right panel).
This is because ListPanel is needed to show the basic information of each
item, while DetailedCard is needed to show the detailed information of each
selected item. DetailedPanel is only needed for Student to show list of Courses for a Student,
and for Course to show list of Student for a Course.
-
As can be seen from the UI diagram above, each of the
Card,DetailedCardandVeryDetailedCardwill subscribe and listen to theViewModelthrough the logic layers. -
Each of these classes will correspond to the observableMap in
ViewModel -
When there is a change to the model, the
ViewModelwill update its observableMap -
As each of these classes in
Viewsubscribe to theViewModel, the UI will update automatically.
1.3. ViewController/Logic component [Sim Sheng Xue]
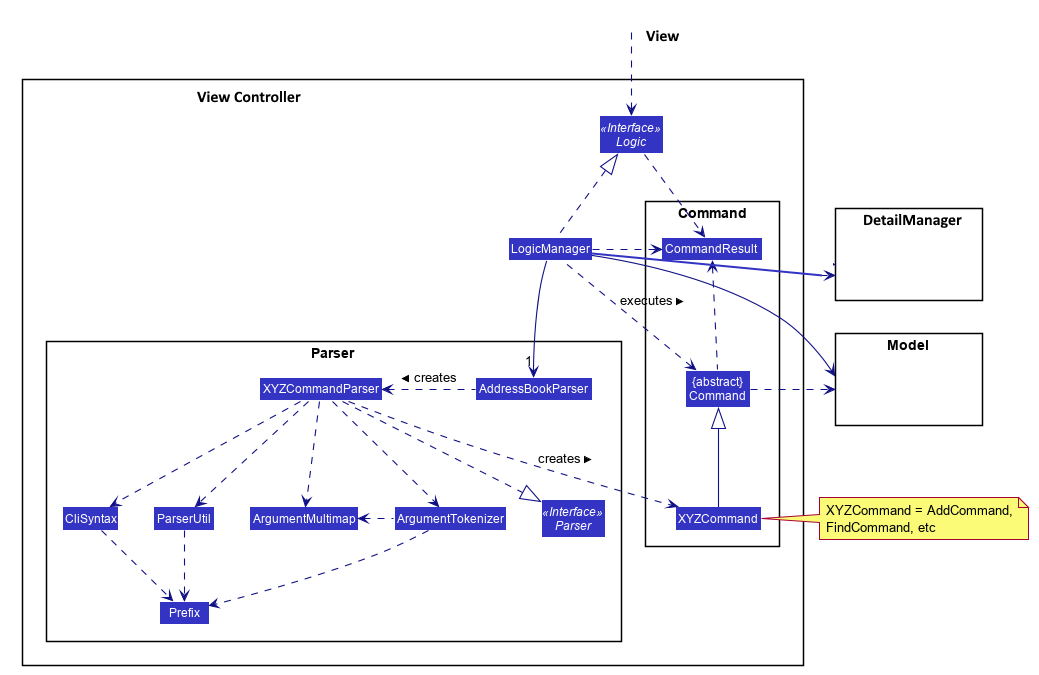
API :
Logic.java
-
ViewControlleruses theAddressBookParserclass to parse the user command. -
This results in a
Commandobject which is executed by theLogicManager. -
The command execution can affect the
Model(e.g. adding a student). -
The
LogicManagerwill invoke the relevant class located insideModel. For Entity CRUD commands, theModelManagerwill be invoked. For Link CRUD commands, theEdgeManagerwill be invoked. For Progress CRUD commands, theProgressManagerwill be invoked. -
The Managers will post events to the
EventsCenterSingleton. The subscribing managersDetailManagerandStorageManagerwill listen to new publish events in the event bus. TheViewalso subscribes toDetailManager. This allows for the commands executed by theLogicManagerto moify both the View and Storage. -
The result of the command execution is encapsulated as a
CommandResultobject which is passed back to theView. -
In addition, the
CommandResultobject can also instruct theViewto perform certain actions, such as displaying help to the user.
1.4. ViewModel component [Hieu]

API: ViewModel.java
The ViewModel,
-
stores a list of
observableMap, each map will corresponds to oneDetailPanelin ui folder. -
Each
DetailPanel(in MainWindow) will listen to theViewModelthrough the Logic layer. -
the
ViewModelwill then query the managers fromModellayer to update its observableMap, which in turn will automatically update the correspondingDetailPanelview.
1.5. Model component [Tee Jun Jie Ivan]
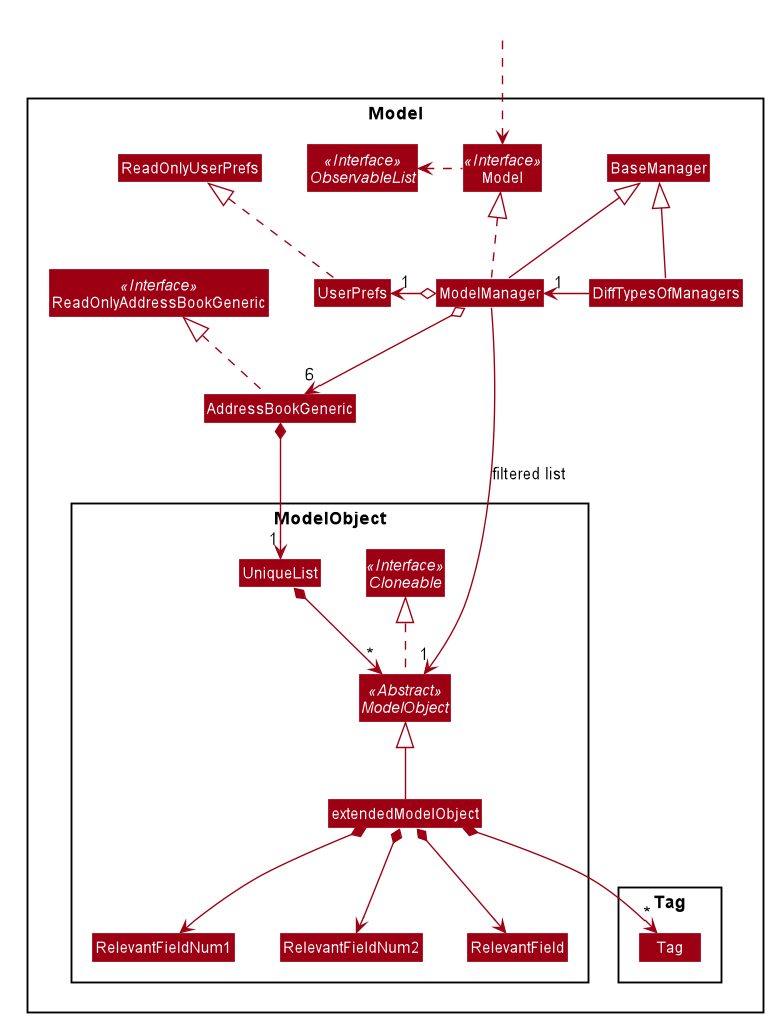
API : Model.java
The Model,
-
stores a
UserPrefobject that represents the user’s preferences. -
stores the 6 AddressBookGeneric<K extends ModelObject>, each of which holds a different type of ModelObject. The 6 types are namely
-
Student
-
Course
-
Staff
-
Assignment
-
Progress
-
Finance
-
-
exposes an unmodifiable
ObservableList<K extends ModelObject>that can be 'observed' e.g. the UI can be bound to this list so that the UI automatically updates when the data in the list change. -
does not depend on any of the other components.
Below is an example of the different types of RelevantFields that can be tied to an Assignment.
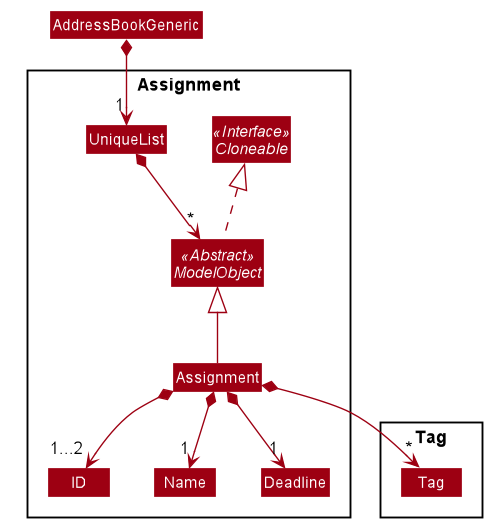
| The AddressBookGeneric in the diagram above is actually an AddressBookGeneric<Assignment>. The AddressBookGeneric has been made to accept any class that extends ModelObject. This cannot be shown due to limitations in PlantUML. |
1.5.1. Notable Implementations in Model
-
By making use of
GenericsandPolymorphism, the group has made it such thatAddressBookGeneric<K extends ModelObject>can hold any class that extends from ModelObject- Benefits
-
-
Allows for code optimization by having reusable code. There is significant decrease in workload when code can be reused for each others' benefit instead of having duplicated code.
-
Allows for extension easily for future features. Future features that involve creating new AddressBooks can be developed very quickly and allow for faster development of future features.
-
-
All
ModelObjectsimplementCloneableso as to allow for Defensive Programming more easily.-
Please refer to
Step 2 of Section 2.2.2for the team’s rationale behind having ModelObject implement Cloneable.
-
-
All Non-Crud Commands such as
Assign/Un-assign/Doneare handled inDiffTypesOfManagerssuch asEdgeManagerorProgressManagerinstead of having all implementations being done inModelManager- Benefits
-
-
Easier implementation since lower level implementations can be abstracted away
-
More decoupling which will lead to be better testability and easier debugging
-
1.6. Storage component [Sim Sheng Xue]
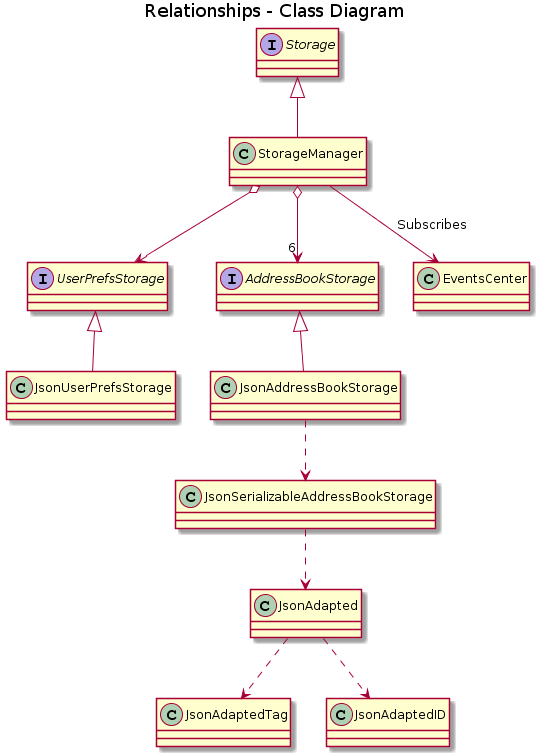
The Storage component,
-
can save
UserPrefobjects in json format and read it back. -
can save the Address Book data in json format and read it back.
-
The
StorageManagersubscribes to theEventCenter. It will listen to both DataStorageChangeEvent and DeleteEntitySyncEvent. DataStorageChangeEvent occurs when basic information about each object is changed, except for deletion. DeleteEntitySyncEvent occurs when an object is deleted, and the storage has to be update to maintain consistency. For example, when a Course is deleted, the DeleteEntitySyncEvent will trigger the storage to remove the Course from every Student assigned to this Course.
1.7. Common classes
Classes used by multiple components are in the seedu.addressbook.commons package.
2. Implementation
This section describes some noteworthy details on how certain features are implemented.
2.1. Unique Identification of Entities [Sim Sheng Xue]
-
UUID Manager- Ensures ID of all entities are unique, allowing each object to be uniquely identifiable
2.1.1. UUID Manager
-
All ModelObjects have their own ID which is generated by UUID manager
-
For Progress objects, the ID is a composite ID of assignmentID and studentID
Consideration:
Each ModelObjects should have a ID generated that is unique among the entire application, across history.
For example, not only can two Students not have the same ID, but a Student and a Staff cannot have
the same ID. This design consideration is taken due to the existence of Finance.
The Finance object can represent a Student paying for a Course. When the Student is deleted,
the Finance object is not deleted. This is due to the need to track the Finance of the coding camp,
even though the Student has left the camp(and assuming there is no refund, if not the owner
can delete the Finance object).
Hence, this means that if the ID is not unique among deleted objects, there may be inconsistent information located in the Finance objects.
2.2. Entity Linking - Assigning/Un-Assigning an Entity to/from a Course [Tee Jun Jie Ivan]
In order to allow the tracking of the students/assignments/teachers that are assigned to a course and vice versa, this required us to implement a structure which allowed us to obtain information from the aforementioned objects, without causing any circular referencing errors.
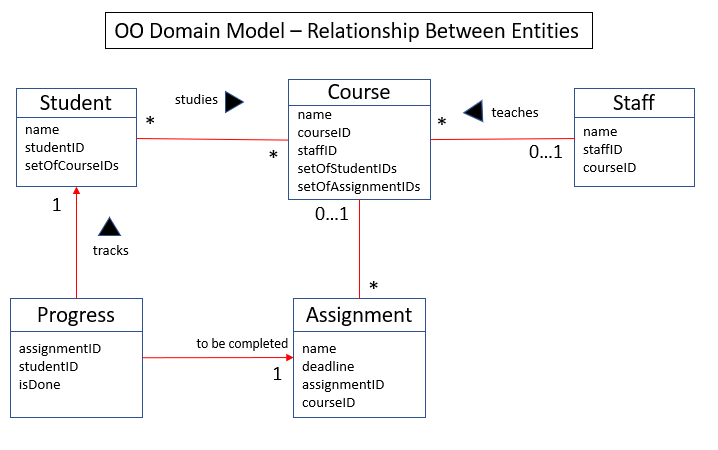
The group came up with the structure above where we centralize most links around the Course object so as for easier management of entity links.
Notice that Student does not hold a Course, but a set of CourseIDs. Hence, there should be an association between Student and ID instead of Student and Course.
However, the group found it much more intuitive to think of the associations to be from 2 modelObjects rather than to and from IDs.
Every non-directed association between 2 objects ensures that both objects have each other’s ID.
|
The only exception is Progress objects which are created via a composite ID of studentID and assignmentID.
A more detailed explanation of Progress Management is explained in Section 2.3, “Student Progress Management [Tee Jun Jie Ivan]”.
Entity Linking is managed exclusively by Edge Manager
-
Ensures that links are maintained/removed properly during assign, un-assign, delete commands API :
EdgeManager.java
2.2.1. Execution of Assign/Un-assign Command [Tee Jun Jie Ivan]
For the actual execution of an assign/un-assign command, 2 main steps are performed.
-
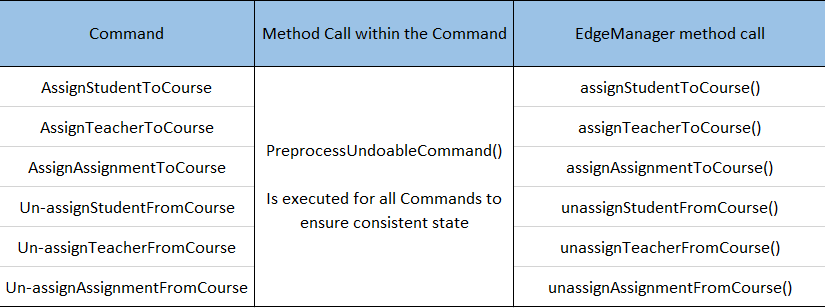
Pre-process the targeted entities to ensure consistent state - Via
PreprocessUndoCommandmethod call -
Add/Remove both object’s ID into/from each other - Handled by
EdgeManager
Step 1: Preprocess Entities
Rationale
Firstly, a pre-processing step must be performed before executing an undo-able assign/un-assign command to ensure
that all entity links are in correct state before command execution.
This means that either
-
Both targeted objects have each other’s IDs or
-
They do not
There should be no instance where Course has an Assignment/Student/Staff’s ID but they do not have the Course’s ID or vice versa.
Current Implementation
Below is an activity diagram showing the pre-processing performed for assign commands. The diagram can be generalized for un-assign commands by checking if the course contains X and vice versa in the second stage instead.
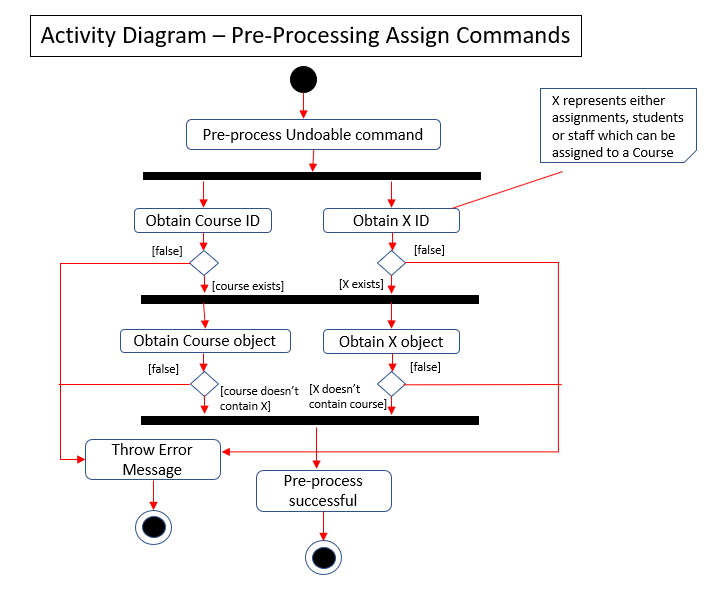
Notice that there are 2 main exit points in the activity diagram.
-
The success case is straightforward and will lead to a the program continuing to execute the actual assign/un-assign command.
-
For the failure case, should any of the conditions fail, this means that either that the
-
specified objects does
not exist, -
both entities are
already assignedto each other or, -
most importantly, that the model is in an
inconsistent statewhere one entity is assigned to the other but not vice versa.
-
Step 2: Assign IDs via EdgeManager
Rationale
After the necessary checks have been performed, respective IDs need to be added to the targeted course and targeted object in order to ensure correct and consistent assigning of objects.
Current Implementation
Below is a sequence diagram of how EdgeManager adds the IDs to the two objects involved.
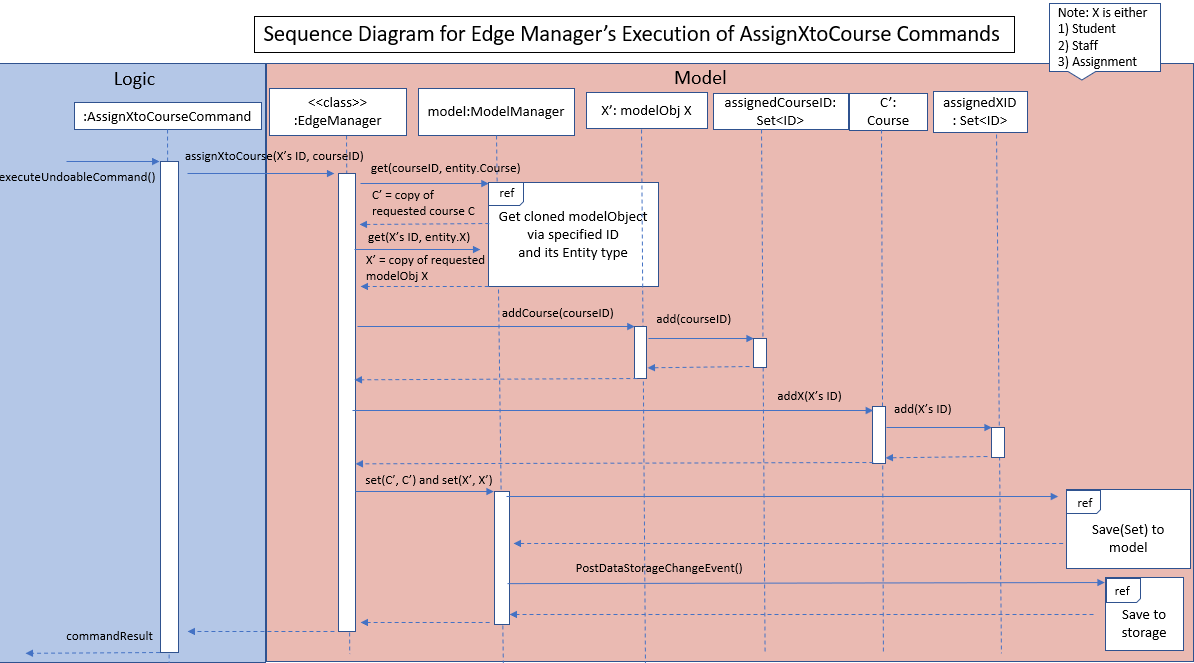
The flow of an assign command is as follows:
-
Obtain a copy of the requested
modelObjectsfromModelManager-
One of which must be a
CoursemodelObject, the other being either aStudent/Staff/AssignmentmodelObject
-
-
For object X', add the
courseIDinto the assignedCourseIDs in X`-
For assignments, every assignment can only be assigned to at most one course. Hence, it’ll hold just an assignedCourseID instead of a set of Course IDs.
-
-
For Course C', add
X’s IDinto assignedXIDs in C'-
For courses, every course may only have at most one teacher. Hence, course will have an assignedTeacherID instead of a set of Teacher IDs.
-
-
Update the 2 affected models by executing
set(targetObj, editedObj)in modelManager for both changed modelObjects -
Update the storage by running postDataStorageChangeEvent() - ref to
Figure 2to understand how storage save is triggered
This sequence diagram can be generalized for un-assign command as well.
Instead of adding IDs, un-assign will remove each other’s ID from the respective objects.
|
Design Considerations
-
Manipulating the
actualmodelObjects by having modelManager#get() return referenced variable of the actualmodelObjectTags.- Pros
-
-
Simpler implementation since any changes to the model will change the actual object directly
-
Faster execution since any changes is done to the actual modelObject
-
- Cons
-
-
Might allow for unintentional changes to the actual modelObject
-
-
(Current Implementation) Manipulate a
clonedmodelObject by having modelManager#get() return a copy of actual modelObject.- Pros
-
-
Prevents unintentional modifications of the shared object
-
- Cons
-
-
Extra processing required. For example, a method is required to replace the old modelObject with the new model object. Also, requires all ModelObject classes to implement a clone() method.
-
More memory intensive and can hurt overall program performance.
-
Overall, the second option was chosen since the program is very dependent on maintaining a consistent state, where either 2 modelObjects have each other’s ID or they do not.
Some performance can be sacrificed in order to ensure that the links between objects cannot be modified by mistake.
Summary of Entity Linking
Overall, in order to ensure successful entity linking, the role that EdgeManager plays is crucial.
The table below shows the method calls made to EdgeManager during an Assign/Un-assign command.
2.3. Student Progress Management [Tee Jun Jie Ivan]
The Progress of students is managed exclusively by the ProgressManager class.
API : ProgressManager.java
2.3.1. Student Progress Creation/Removal
Rationale
New Progress objects must be created in 2 main scenarios.
-
If a
Studenthas been added to aCourse, theStudentwill need to complete allAssignmentsthat have already been assigned to theCourse. -
If an
Assignmenthas been added to aCourse, allStudentscurrently taking theCoursemust now complete thatAssignment.
The rationale is similar when un-assigning either Student or Assignment from a Course.
Progress objects need to be removed instead.
Current Implementation
Below is a sequence diagram illustrating how the ProgressManager adds Progress objects into the ProgressAddressBook when a AssignStudentToCourse command is run.
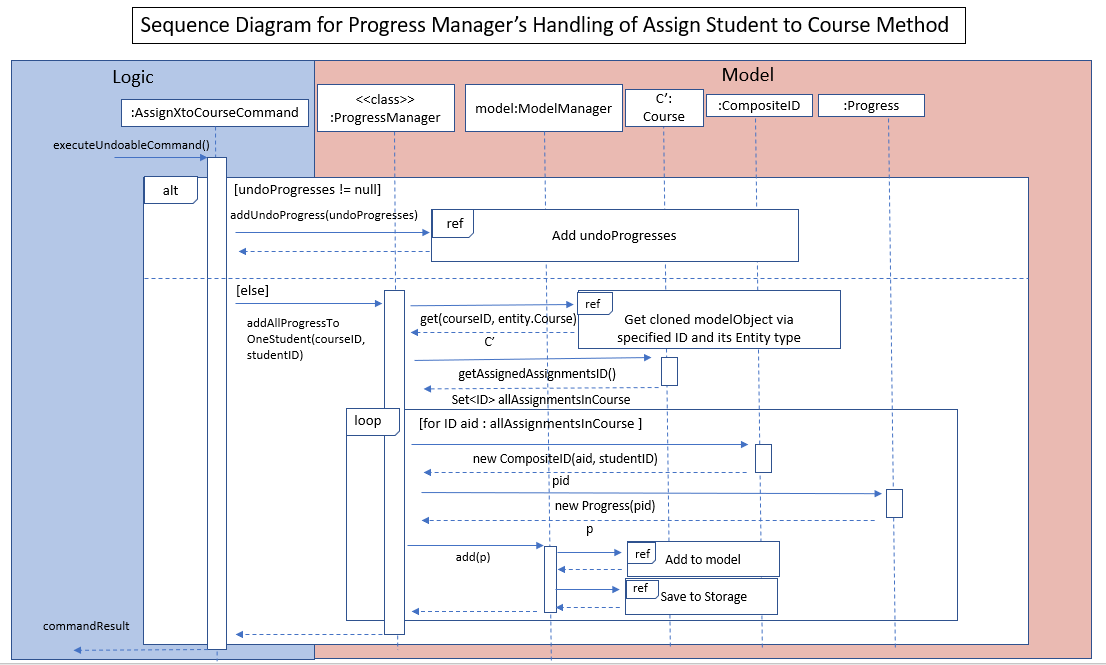
The flow of adding Progress objects in a AssignStudentToCourse is as follows
-
If there are
Progressobjects that were previously in ProgressAddressBook but were removed due to anUn-assign/Deletecommand, add thoseProgressobjects back in.-
This only occurs when undo-ing an
Un-assign/Deletecommand. Refer to Section 2.4.2, “Opposite command for assign/ un-assign [Tee Jun Jie Ivan]” for more information.
-
-
Else, i.e. if this is an entirely new AssignStudentToCourse command,
-
Obtain C', a copy of the targeted
Course -
From C', obtain all assignmentIDs that are assigned to it.
-
For each of the obtained assignmentIDs, create a new CompositeID of assignmentID and studentID
-
Create a
Progressobject using each of theCompositeID -
Finally, add these
Progressobjects into theProgressAddressBook.
-
Notes
-
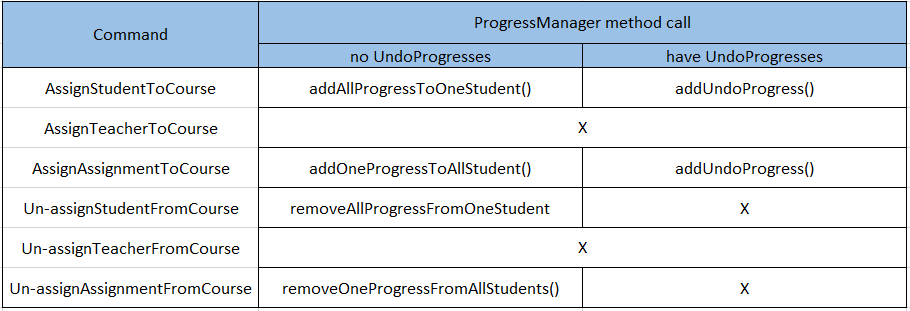
The flow is largely the same for AssignAssignmentToCourse! Instead, we want every
Studentthat is currently studying in course C' to complete the particularAssignment. Hence, rather than obtain all assignmentIDs, we will need to obtain allstudentIDsthat are studying C', and create aProgressobject so that we can track whether those students have completed the assignment. -
The flow is also largely the same for UnassignCommands! Instead, we are looking to remove Progress objects rather than adding them back in.
-
Notice that we have hidden all access to
Progressobjects behindProgressManager. Hence, the user cannot, and should not, be able to create their ownProgressobjects.
The table below shows the summary of method calls from ProgressManager for each variant of Assign/Un-assign command.
2.3.2. Marking Progress as Done/Undone
Rationale
When a Student finishes an Assignment that is allocated to him, you want to be able to mark his work
as Done.
Similarly, if an Assignment has been mistakenly marked as Done or is actually Undone, you want to be able
to mark the Assignment as Undone.
Current Implementation
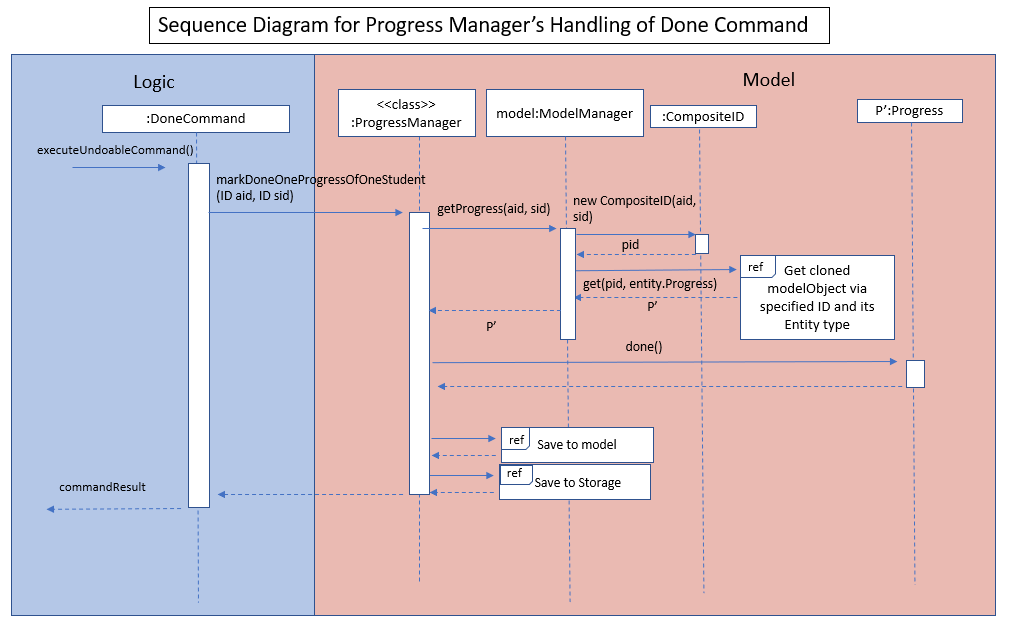
The implementation of Done command is very straight-forward. Only 2 parameter is needed - assignmentID (aid) and studentID (sid).
-
Create the CompositeID of
Progressobjects using the aid and sid -
Using this newly created compositeID, call modelManager#get(ID id, entity.type)
-
This returns a
copyof theProgressobject - P'.
-
-
Execute
P'#done()-
If
P'is already done, an exception will be thrown -
Else,
P'will be set its internal boolean isDone to be true.
-
-
Save the edited
Progressobject to model -
Save the edited
Progressobject to storage
With this, the implementation of Undone command is about the same, we just have to call P'#undone() instead.
Design Consideration
There is 1 main considerations when implementing Progress objects.
-
Is there a need to separate
AssignmentandProgress?-
Implementation 1 - Have
Assignmenthold 1StudentIDand a 1isDoneboolean- Pros
-
-
Simple to implement
-
- Cons
-
-
Memory-intensive since every student can have up to N number of
Assignments -
Suppose that a field in the
Assignmentneeds to be updated, the program needs to loop through every singleAssignmentobject to update that particular field, resulting in high computational costs. -
With an additional link from
AssignmenttoStudent, it will be require more work to maintain the correctness of the linking.-
In
Section 2.3, the decided implementation was to centralize all links aroundCourse. -
Hence, if another type of link was to be introduced, another
managerwill need to be implemented.
-
-
-
Implementation 2 (Current Implementation) - Separate the logic of
AssignmentandProgress.Assignmentsjust need to hold its ID, name and deadline whileProgresswill handle whether aStudenthas completed thatAssignmentor not.- Pros
-
-
Intuitive and simple to understand
-
In-line with Object Oriented Programming since it can be modelled as a real world object.
-
As most people have been through school, they can understand that when given a homework/assignment in school, there is actually only 1
Assignmentthat everyStudenthas to complete. This idea is basically what we have implemented.
-
-
Solves the first disadvantage of Implementation 1. Any time the details of the
Assignmentis changed, the details will be automatically changed for allProgressobjects. -
Works well with current implementation of AddressBookGeneric which has
gettersandsettersviaIDsince everyProgressobject will have its ownID
-
- Cons
-
-
Also very memory intensive
-
-
2.4. Undo/Redo [Hieu]
Currently we only support undo/redo for commands that modify the storage (or state of the app). I.e add / delete, assign / un-assign, edit commands.
View Controller (LogicManager) will hold UndoRedoStack class, which stores the undoStack and redoStack which will be explained below.
Those commands listed above will inherit from UndoableCommand abstract class. UndoableCommand will extends from Command class.
UndoableCommand will contain the general algorithm flow for doing undo/ redo, while there will be some details delegated to the actual command class. This technique is also known as template pattern.
public abstract class UndoableCommand extends Command {
    public abstract void preprocessUndoableCommand() {}

    public abstract void generateOppositeUndoableCommand();

    public CommandResult executeUndoableCommand();
    @Override
    public CommandResult execute() {
        preprocessUndoableCommand();
        generateOppositeUndoableCommand();
        return executeUndoableCommand();
    }
}
Note that for each UndoableCommand, before execution, it needs to save some information (through the preprocessUndoableCommand) then generate (and store) the opposite corresponding command (through generateOppositeUndoableCommand)
Let’s go through the example in diagram below. - The user first executes a new UndoableCommand delete-student. Before this delete command is executed, we preprocessUndoableCommand to get the to-be-deleted student object, as well as the current index of this student object in list.
-
Then we will generate a AddStudentCommand (which is opposite of this DeleteStudentCommand) with this studentObject and index and push it to undoStack
-
When undo command is executed, the top of undoStack is popped out, then pushed to redoStack. Then the oppositeCommand of it will be excecuted (in this case AddStudentCommand will be invoked)
-
When redo command is executed, the top of redoStack is popped out, then pushed to undoStack. Then the originalCommand will be executed (again) (in this case it will be DeleteStudentCommand again).

-
Design Considerations: 1/ How Undo and Redo works: Option A: Save the entire app state after every command. Pros: Very easy implementation. Cons: Serious memory performance issue when storing the whole address book at every time step.
Option B (Current choice): Each (undoable) command will know how to generateOpposite command itself. Pros: Reduce a lot of memory issue.
Cons: Harder to implement
2.4.1. Opposite Command for edit [Dat]
In EditCommand class, method preprocessUndoableCommand to get the toEdit Object and edited Object.
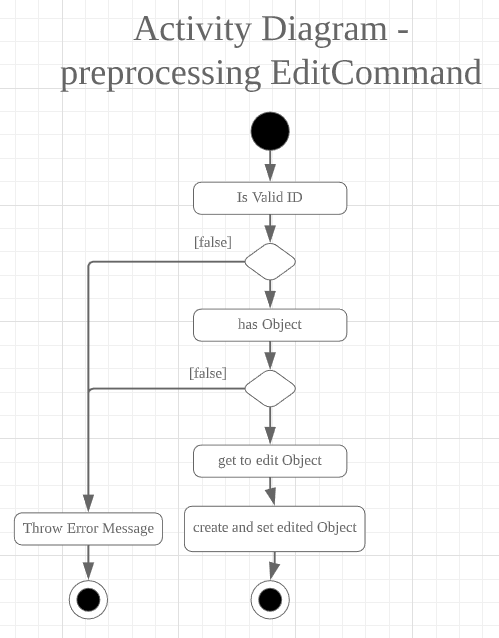
Method executeUndoableCommand will set the toEdit Object in the ObjectAddressBook to the edited Object.
Method generateOppositeCommand() will generate another EditCommand (which
is opposite to this EditCommand) with editing information of the original toEdit Object and push it to undoStack.
When undo and redo commands are executed, the process is carried out as described above.
2.4.2. Opposite command for assign/ un-assign [Tee Jun Jie Ivan]
Generating of opposite commands for assign and un-assign commands is very intuitive. The opposite of assign is un-assign and vice versa.
The tricky part comes after you un-assign a Student/Assignment from a Course and have removed the affected Progress objects.
When you want to undo the un-assign command, you need to add back those particular Progress objects which were just removed instead of adding new undone Progress objects.
This is because those removed Progress objects may or may not be done.
This is achieved by 3 simple, additional steps.
-
When pre-processing an un-assign command as per
Step 1 of Section 2.2.2, you’ll need to assign allProgressobjects that are about to be removed to a variable. -
When
GenerateOppositeCommandis called, via an overloaded constructor, you will need to instantiate a newAssignusing theProgressobjects that you have saved:public AssignAssignmentToCourseCommand(AssignDescriptor assignDescriptor, Set<Progress> undoProgresses)-
This allows the opposite command to add back the removed
Progressobjects
-
-
Finally, when
executeUndoableCommandis executed, seeing that the undoProgresses is not null, theAssignCommand will add thoseProgressobjects back. Please see the activity diagram below for a better understanding of when the Undo Progress will be added back in.
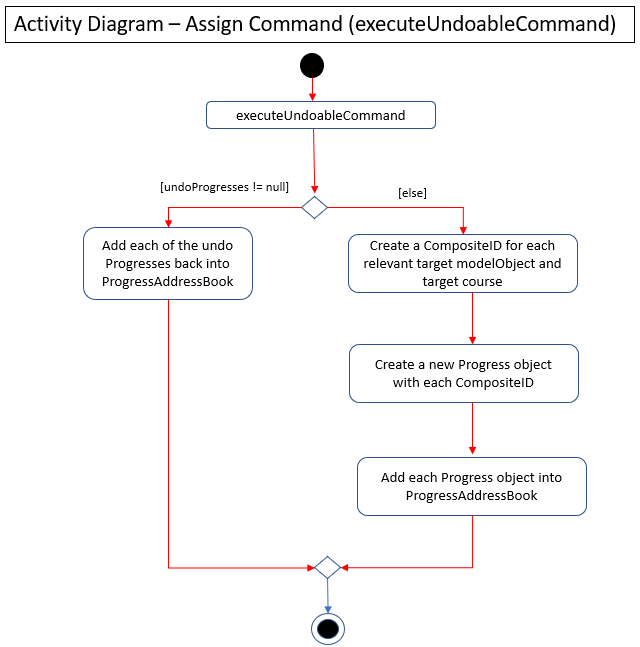
This results in the correct Progress objects, which may or may not be Done, to be added back in instead of completely new Progress objects that are all Undone.
You can also notice that this is a faster implementation since we do not need to re-create a CompositeID and the actual
Progress object itself when we are just adding back the UndoProgresses.
2.4.3. Opposite command for add/ delete (and maintain the corresponding links between entities)
AddCommand and DeleteCommand extends from abstract class UndoableCommand. Thus, user can undo/ redo this command.
In AddCommand class, method preprocessUndoableCommand get the toAdd Object and an index (if available).
Method executeUndoableCommand will add the toAdd Object to the ObjectAddressBook.
Method generateOppositeCommand() will generate a DeleteCommand (which
is opposite to this AddCommand) with toDelete Object is a clone of toAdd Object and push it to undoStack.
In DeleteCommand class, method preprocessUndoableCommand get the toDelete Object and its index.
Method executeUndoableCommand will delete this toDelete Object from the ObjectAddressBook.
Method generateOppositeCommand() will generate an AddCommand (which
is opposite to this DeleteCommand) with toAdd Object is a clone of toDelete Object and push it to undoStack.
When undo and redo commands are executed, the process is carried out as described above.
For DeleteCommand, it is important to ensure that entity links are removed properly.
For AddCommand generated by generateOppositeCommand(), it is important to restore all the entity links properly.
Therefore, in order to ensure undo/redo successfully, all 3 managers must be involved to manage all entity links.
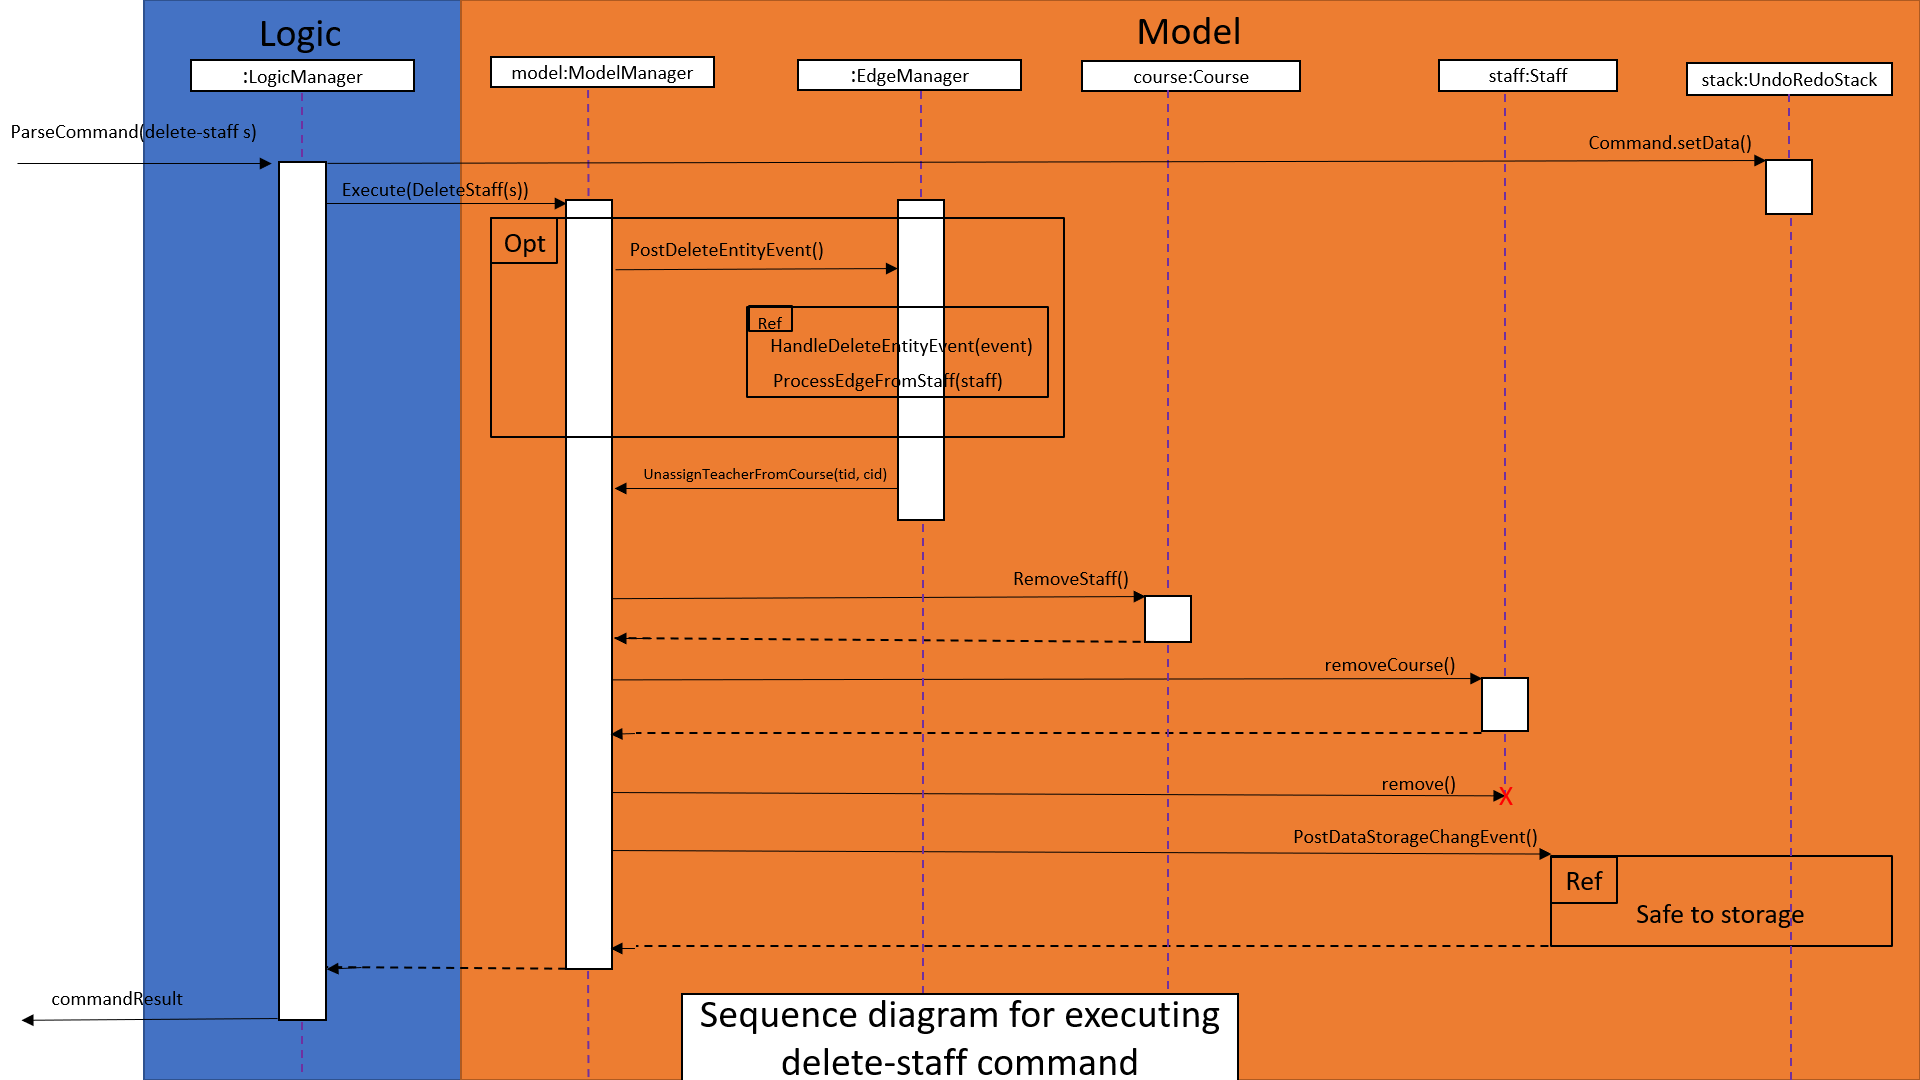
When an object is deleted (Student/Teacher/Course/Assignment), EdgeManager will invoke a DeleteEntitySyncEvent
signal and a DataStorageChangeEvent signal to be handled by StorageManager. generateOppositeCommand() will
generate an add-command with a clone object of deleted object and stacked into undoStack.When an undo command is
executed, this add-command is pop out from the stack and executed, adding the cloned object with all the
information of the deleted object. The flow after add-command called now can be generalized as the previous
delete-command. All the entities links are restored.
2.5. View Switching [HIEU]
To see sub-view details of each section we can issue a select command. Let’s see an example of how selecting sub-view data of a student 1 works.

-
select sid/ 1command is issued toViewController -
ViewControllerwill callViewModelmethodupdateStudentDetailsMap -
In turn, that method will invoke managers from
Modellayer, for exampleModelManager, to updateobservableStudentDetailMapinsideViewModel -
Because
StudentDetailsMapimplements anonChangefunction that listen to update inobservableStudentDetailMap, the UI part will be updated correspondingly with data of this student 1.
Design considerations:
-
Automatically updating the UI sub-view when the app state changes. Let’s say the current sub-view shown in the UI is of the details of student 1, then some information of the course of that student is changed, or the student is removed from the course, the UI should update immediately without the need to issue the click command again. To support that, our
ViewModelwill listen toEventsCenter, then whenever an event ofDataStorageChangeEventorDeleteEntitySyncEventhappens, it will check whichobservableMap(which corresponds to differentDetailedView) is active then do the query again. -
Lazy loading: For example, when seeing details of the students, we only want to show the courses that the students have without the progresses of this course that the student currently have. To query that, after executing
select sid/ student_id, the user needs to runselect sid/ student_id cid/ course-idas well
2.6. Managing Staff Feature [Dat]
2.6.1. Implementation
This feature is implemented with the main classes - Staff, with a permission level specifying Teacher and Admin.
public class Staff extends ModelObject {
    public enum Level {
        TEACHER,
        ADMIN
    }
    //...
}
One of the features is to display all the courses that a teacher is teaching.
Another feature is to keep track of salary payment for teacher. A teacher is paid by teaching a course and the amount
is taken from the salary of the teacher. The payment will automatically have records of respective course and teacher ID.
To pay for admin, user has to do it manually using miscellaneous FinanceType.
Certain approaches have some certain pros and cons. It depends on how the user want to keep track of payment and method to pay to teacher and admin.
2.7. Tracking Miscellaneous Payments/Earnings, Teacher Payments and Student earnings [Sim Sheng Xue]
2.7.1. Implementation
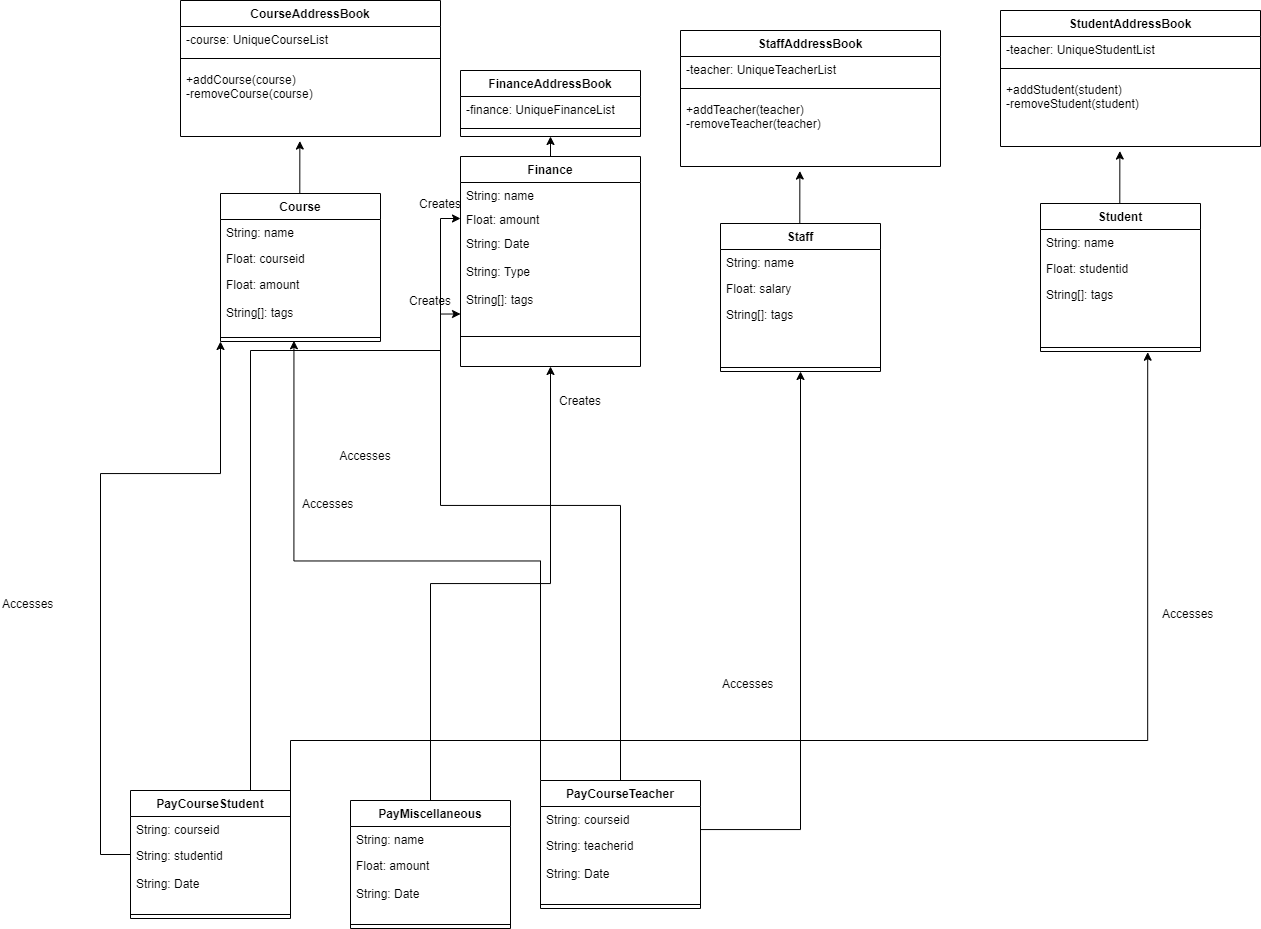
Finance type Miscellaneous or m add command will add a Finance with a given Name (description) from the user.
The amount is sign sensitive, meaning miscellaneous can take in a positive amount or a negative amount corresponding to
earning or expense depending on the user.
Miscellaneous transactions can either be payments or earnings, such as purchases of stationary or advertisement revenue. Teacher payments are tracked by courses, where the teacher is paid for each course taught. Student earnings are also tracked by courses, where the student pays for each course taken.
Finance type Miscellaneous or m will create a Miscellaneous transaction,
where the Amount is specified by the user.
Finance type CourseTeacher or ct add command will access CourseAddressBook and StaffAddressBook to ensure Course and
Staff exist and make sure this staff is teaching this course. The Amount is set to the amount of the Course
(student fee).
Finance type CourseStudent or cs add command will access CourseAddressBook and StudentAddressBook to ensure Course and
Student exist and make sure this student is taking this course. The Amount is set to the amount of the Course
(student fee).
All three Finance types will create a Finance object to store the transaction,
which will be saved in the FinanceAddressBook.
2.8. Navigation among command history in the command box [Sim Sheng Xue]

Coding Camp X supports quick navigation among command history in the command box.
Whenever the user executes a command, it will be added to a stack. If the command
fails to execute or is exactly the same as the previous command executed,
it will not be added to the stack.
The user can click the [UP ARROW] or [DOWN ARROW] keys in the command box to navigate through the executed command history. Since the implementation for [UP ARROW] is similar(as seen in the activity diagram), this guide will explain [DOWN ARROW] in details.
When the user clicks the [DOWN ARROW], the application will check
if the Right Stack is empty. If the Right Stack is empty, this means
that there is no commands below to navigate to. In this case, the command
box will still show the initial command.(No change)
Else if the Right Stack is not empty, the next command will be popped from the top of the Right Stack. Now, two actions will occur in parallel. The command will be added to the Left Stack, and this command will also be shown in the command box. This allows the user to navigate back to the command after with an [UP ARROW] key command. The process will then come to an end.
2.9. Logging
We are using java.util.logging package for logging.
The LogsCenter class is used to manage the logging levels and logging destinations.
-
The logging level can be controlled using the
logLevelsetting in the configuration file (See Section 2.10, “Configuration”) -
The
Loggerfor a class can be obtained usingLogsCenter.getLogger(Class)which will log messages according to the specified logging level -
Currently log messages are output through:
Consoleand to a.logfile.
Logging Levels
-
SEVERE: Critical problem detected which may possibly cause the termination of the application -
WARNING: Can continue, but with caution -
INFO: Information showing the noteworthy actions by the App -
FINE: Details that is not usually noteworthy but may be useful in debugging e.g. print the actual list instead of just its size
2.10. Configuration
Certain properties of the application can be controlled (e.g user prefs file location, logging level) through the configuration file (default: config.json).
3. Documentation
Refer to the guide here.
4. Testing
Refer to the guide here.
5. Dev Ops
Refer to the guide here.
Appendix A: Product Scope
Target user profile (Coding camp owners):
-
need to manage a significant number of teachers, students, courses, assignemnts and finances
-
assign teachers to specific courses
-
assign students to suitable schedules
-
keep track of the courses available
-
keep track of the student’s progress and assignments
-
manage course earnings and staff spending
-
---
-
prefer desktop apps over other types
-
can type fast
-
prefers typing over mouse input
-
is reasonably comfortable using CLI apps
Value proposition:
-
Manage the addition and removal of students quickly
-
Manage the addition and removal of courses quickly
-
Manage the addition and removal of assignments and progress quickly
-
Check the financial status of courses
-
Track student progress for courses quickly
Appendix B: User Stories
Priorities: High (must have) - * * *, Medium (nice to have) - * *, Low (unlikely to have) - *
| Priority | As a … | I want to … | So that I can… |
|---|---|---|---|
|
new user |
see usage instructions |
refer to instructions when I forget how to use the App |
|
user |
add a assignment with a deadline |
|
|
user |
list all assignment tasks |
|
|
user |
list all assignment to be done for a course |
|
|
user |
find a particular assignment |
locate the details of the assignment without going through the whole list of all assignments |
|
user |
edit a assignment’s detail |
quickly change the details of the assignment without creating a new entry and deleting the old one |
|
user |
assign a assignment to course |
|
|
user |
assign a list of assignment to course |
quickly add all assignments to a course without going through them one by one |
|
user |
for every student added to a course, assign a list of progress items to them automatically based on the assignment for the course |
make it more convenient for the administrative staff to assign students to courses |
|
user |
track the progress of an individual student |
to ensure that students are caught up on study materials |
|
user |
track the progress of all students in a particular course |
to get an overview understanding of all students' progress in a course |
|
user |
mark as done the assignment of a student |
|
|
user |
mark as done the assignment of a few/all students for a particular week |
quickly mark students' assignment as done without iterating through all of the assignment |
|
user |
get notified if there is a student with too many undone assignment |
help to easily inform the teachers on the student progress |
|
user |
automate the spendings of the tuition centre due to the salary of the staff |
do not need to manually deduct the savings from the salary at the end of the month |
|
user |
automate the income generated by each of the students according to the course fees payable by the students |
do not need to manually add the income generated at the end of the month |
|
user |
able to know how much we are spending by adding the name and price of the items or services bought |
keep track of the expenses of the tuition centre |
|
user |
be able to know how much we are earning by adding the various sources of income such as through students course fees, or miscellaneous sources like textbook sales |
keep track of the earnings of the tuition centre |
|
user |
tag each of the spendings of the tuition centre with the priority levels, such as “must-have”, “nice-to-have”, or “not-needed” |
evaluate the necessity of the spendings of the tuition centre |
|
user |
be able to tag each of the spendings with the department that they are from |
better understand which department is spending on what types of goods and services |
|
user |
view the statistics of the finances at periods such as day, week of month |
better plan ahead |
|
user |
be able to track the payment status of each customer |
ensure that all customers have paid on time |
{More to be added}
Appendix C: Use Cases
(For all use cases below, the System is the Code Camp X and the Actor is the user, unless specified otherwise)
Use Case 1: Adding a assignment
MSS
-
User inputs an 'add assignment' command with name and deadline
-
CCX adds the assignment into the system + Use case ends.
Extensions
-
1a. No name/deadline is provided.
-
1a1. CCX shows an error message.
Use case ends.
-
1b. The Date deadline is wrongly formatted.
-
-
1b1. CCX shows an error message.
Use Case 2: Listing all assignment
MSS
-
User requests to see all assignment
-
CCX outputs all assignment in its database
Use case ends.
Extensions
-
1a. List is empty.
Use case ends.
Use Case 3: Deleting a assignment
MSS
-
User sees all assignment using UC2
-
User requests to delete assignment using its respective assignmentID
-
CCX finds the assignment using UC4
-
CCX removes the assignment from the system
-
CCX outputs a success message with the details for the assignment
Use case ends.
Extensions
-
2a. assignmentID does not exist.
-
2a1. CCX shows an error message.
Use case ends.
-
Use Case 4: Finding an assignment by assignmentID
MSS
-
User sees all assignment using UC2
-
User requests to view a assignment using its respective assignmentID
-
CCX searches the the system for the relevant assignment
-
CCX outputs a success message with the details for the assignment
Use case ends.
Extensions
-
2a. assignmentID does not exist.
-
2a1. CCX shows an error message.
Use case ends.
-
Use Case 5: Edit a assignment using assignmentID
MSS
-
User sees all assignment using UC2
-
CCX outputs the whole list of assignment
-
User requests to edit a assignment using its respective assignmentID
-
CCX finds for the specific assignment using UC4
-
CCX changes the details of the assignment
-
CCX outputs a success message with the updated details for the assignment
Use case ends.
Extensions
-
3a. assignmentID does not exist.
-
3a1. CCX shows an error message.
Use case ends.
-
3b. New deadline provided is not properly formatted.
-
-
3b1. CCX shows an error message.
Use case ends.
-
3c. No new details are provided.
-
-
3c1. CCX shows an error message.
Use case ends.
Use Case 6: Assign a assignment to a course
MSS
-
User requests to see assignment using UC2
-
CCX outputs the whole list of assignment
-
User requests to see all courses using UC20
-
User requests to assign a assignment to a course using their respective IDs
-
CCX adds the assignmentID into the course’s list of assignment
-
CCX outputs a success message with the successful addition of assignment
Use case ends.
Extensions
-
4a. assignmentID does not exist.
-
4a1. CCX shows an error message.
Use case ends.
-
4b. courseID does not exist.
-
-
4b1. CCX shows an error message.
Use case ends.
Use Case 7: Assign several assignment to a course
MSS
-
User requests to see assignment using UC2
-
CCX outputs the whole list of assignment
-
User requests to see all courses using UC20
-
User requests to assign a list of assignment to a course using their respective IDs
-
CCX adds the list of assignmentID into the course’s list of assignment
-
CCX outputs a success message with the successful addition of assignment
Use case ends.
Extensions
-
4a. Any one of the assignmentID does not exist.
-
4a1. CCX shows an error message.
Use case ends.
-
4b. courseID does not exist.
-
-
4b1. CCX shows an error message.
Use case ends.
Use Case 8: Signup a student to a course
MSS
-
User requests to see all students using UC21
-
CCX outputs the whole list of students
-
User requests to see all courses using UC20
-
User requests to signup a student to a course using their respective IDs
-
CCX finds all assignment assigned to the course
-
CCX creates a Progress object for each assignment and ties it to the student ID
-
CCX adds the Progress object into the system
-
CCX outputs a success message
Use case ends.
Extensions
-
4a. studentID does not exist.
-
4a1. CCX shows an error message.
Use case ends.
-
4b. courseID does not exist.
-
-
4b1. CCX shows an error message.
Use case ends.
Use Case 9: View progress for a particular student, for a certain course
MSS
-
User requests to see all students using UC21
-
CCX outputs the whole list of students
-
User requests to see all courses using UC20
-
User requests to view the progress for a student, for a course using their respective IDs
-
CCX finds all Progress objects using the courseID and studentID
-
CCX outputs all the respective Progress objects
Use case ends.
Extensions
-
4a. studentID does not exist.
-
4a1. CCX shows an error message.
Use case ends.
-
4b. courseID does not exist.
-
-
4b1. CCX shows an error message.
Use case ends.
-
4c. Student is not assigned to the course.
-
-
4c1. CCX shows an error message.
Use case ends.
Use Case 10: View progress for all students, for a certain course
MSS
-
User requests to see all courses using UC20
-
User requests to view the progress for all students for a course using their respective IDs using UC9
-
CCX finds all Progress objects using the courseID and studentID
-
CCX outputs all the respective Progress objects
Use case ends.
Extensions
-
2a. courseID does not exist.
-
2a1. CCX shows an error message.
Use case ends.
Use Case 11: Mark a student’s Progress object as done
MSS
-
User requests to see a student’s Progress for a certain course using UC9
-
User requests to view the mark a particular Progress as 'Done' using the progressID
-
CCX outputs a success message with the updated Progress object
Use case ends.
Extensions
-
2a. progressID does not exist.
-
2a1. CCX shows an error message.
Use case ends.
Use Case 12: Adding a finance
MSS
-
User inputs an 'add finance' command with name and amount
-
CCX adds the finance into the system + Use case ends.
Extensions
-
1a. No name/amount is provided.
-
1a1. CCX shows an error message.
Use case ends.
-
1b. The amount is wrongly formatted (such as containing a non-number character).
-
-
1b1. CCX shows an error message.
Use Case 13: Listing all finance
MSS
-
User requests to see all finance
-
CCX outputs all finance in its database
Use case ends.
Extensions
-
1a. List is empty.
Use case ends.
Use Case 14: Deleting a finance
MSS
-
User sees all finance using UC13
-
User requests to delete finance using its respective financeID
-
CCX finds the finance using UC15
-
CCX removes the finance from the system
-
CCX outputs a success message with the details for the finance
Use case ends.
Extensions
-
2a. financeID does not exist.
-
2a1. CCX shows an error message.
Use case ends.
-
Use Case 15: Finding a finance by financeID
MSS
-
User sees all finance using UC13
-
User requests to view a finance using its respective financeID
-
CCX searches the the system for the relevant finance
-
CCX outputs a success message with the details for the finance
Use case ends.
Extensions
-
2a. financeID does not exist.
-
2a1. CCX shows an error message.
Use case ends.
-
Use Case 16: Edit a finance using financeID
MSS
-
User sees all finance using UC13
-
CCX outputs the whole list of finance
-
User requests to edit a finance using its respective financeID
-
CCX finds for the specific finance using UC15
-
CCX changes the details of the finance
-
CCX outputs a success message with the updated details for the finance
Use case ends.
Extensions
-
3a. financeID does not exist.
-
3a1. CCX shows an error message.
Use case ends.
-
3b. New finance provided is not properly formatted (such as containing a non-number character).
-
-
3b1. CCX shows an error message.
Use case ends.
-
3c. No new details are provided.
-
-
3c1. CCX shows an error message.
Use case ends.
Use Case 17: View details for a particular student
MSS
-
User request to see a student’s details
-
CCX outputs a success message with student’s detail with name, description and payment list
Extensions
-
1a. studentID does not exist
-
1a1. CCX shows an error message
Use Case 18: Mark a student’s course payment object as paid
MSS
-
User requests to see a student’s payment list using UC12
-
User requests to mark a particular unpaid payment as 'Paid' using the paymentID
-
CCX outputs a success message with the updated payment list object
Use case end
Extensions
-
1a. studentID does not exist
-
1a1. CCX shows an error message
-
2a. no payments exists
-
-
2a1. CCX shows a message saying no payment list found
Use Case 19: Edit a student info using studentID
MSS
-
User requests to see a student info using UC17
-
User requests to edit the student’s information and provide edit information
-
CCX outputs a success message with the updated student description
Use case ends
Extensions
-
1a. studentID does not exist
-
1a1. CCX shows an error message
Use Case 20: View all on going courses
MSS
-
User requests to see all on going courses
-
CCX outputs a success message with a list of all on going courses
Use case ends
Extensions
-
1a. No on going courses available
-
1a1. CCX shows an empty list of courses
Use Case 21: View all students
MSS
-
User request to see all the students
-
CCX outputs a success message with a list of all students
Use case ends
Extensions
-
1a. No student in the database
-
1a1. CCX shows an empty list of students
-
Use Case 22: Adding a new Student
MSS
-
User request to add a new Student
-
User input student’s name and other information
-
CCX outputs a success message with student object and studentID
Use case ends
Use Case 23: Adding a new Teacher
MSS
-
User request to add a new teacher
-
User input teacher’s name and other information
-
CCX outputs a success message with teacher object and teacherID
Use case ends
Use Case 24: Adding a new Staff
MSS
-
User request to add a new staff
-
User input teacher’s name and other information
-
CCX outputs a success message with staff object and staffID
Use case ends
Use Case 25: Adding a new course
MSS
-
User request to add a new course
-
User input course’s name and other information
-
CCX outputs a success message with course object and courseID
Use case ends
{More to be added}
Appendix D: Non Functional Requirements
-
The
CCXprogram should work on any mainstream OS as long as it has Java11or above installed. -
The
CCXprogram should be able to hold up to 1000 persons without a noticeable sluggishness in performance for typical usage. -
A user with above average typing speed for regular English text (i.e. not code, not system admin commands) should be able to accomplish most of the tasks faster using commands than using the mouse.
-
The
CCXprogram supports one-shot command - command that are executed using only one single line of user input. -
User must ensure to have a free disk space of at least 100 Megabytes (MBs) in the drive to store the program.
-
The
CCXprogram should be able to run with or without internet connection. -
The
CCXprogram should work for a single user only. -
The
CCXprogram should not require user to make any software installments. -
The
CCXprogram should support English language only. -
The
CCXprogram Graphic User Interface (GUI) should support screen resolution of 1920 x 1080 or higher. {More to be added}
Appendix E: Glossary
- Student
-
A student that has a studentID and description
- Teacher
-
A teacher that has a teacherID and description
- Staff
-
A staff that has a staffID and description
- Course
-
A course that contains a list of attended students, a teacher and a list of assignments
- Assignment
-
A task that is to be done before a certain date
- Progress
-
An object that contains a assignment, a isDone boolean and is tied to student.
- Signup
-
Officially adds a paying student to a course
- Finance
-
An object that contains payments, and whether it is an earning or expense
- Payment
-
An object that contains the amount, a deadline to pay and pay date
Appendix F: Product Survey
Product Name
Author: …
Pros:
-
…
-
…
Cons:
-
…
-
…
Appendix G: Instructions for Manual Testing
Given below are instructions to test the app manually.
| These instructions only provide a starting point for testers to work on; testers are expected to do more exploratory testing. |
G.1. Launch and Shutdown
-
Initial launch
-
Download the jar file and copy into an empty folder
-
Double-click the jar file
Expected: Shows the GUI with a set of sample contacts. The window size may not be optimum.
-
-
Saving window preferences
-
Resize the window to an optimum size. Move the window to a different location. Close the window.
-
Re-launch the app by double-clicking the jar file.
Expected: The most recent window size and location is retained. { more test cases … }
-
G.2. Deleting a student
-
Deleting a student while all students are listed
-
Prerequisites: List all students using the
listcommand. Multiple students in the list. -
Test case: (example)
delete-student 16100
Expected: Student with ID 16100 is deleted from the list. Details of the deleted student shown in the status message. Status bar is updated. Related information, such as course student 16100 was taking, updated accordingly. -
Test case:
delete-student 0
Expected: No student is deleted. Error details shown in the status message. Status bar remains the same. -
Other incorrect delete commands to try:
delete-students,delete-student x(where x is a number not matching any student IDs) {give more}
Expected: Similar to previous.
-
{ more test cases … }
G.3. Assign a student to a course
-
Assign a student to a course that has several assignments
-
Prerequisites: List all courses using the
list-coursecommand. Select to view a course, multiple assignments are assigned to that course. -
Test case: (example)
assign sid/16100 cid/55160
Expected Student with ID 16100 is assigned to course 55160. Details of the student will be added to the course. The student is assigned all the assignments in the course (the progresses are created). Status bar is updated accordingly. -
Test case: (example)
assign sid/16100 cid/49273
Expected: Error message throws saying no course ID matches with this course (Assumed this course ID does not exist). Error details shown in the status message. Status bar remains the same. -
Other incorrect delete commands to try:
assign sid/16100 cid/55160, (where student 16100 is already assigned to course 55160) {give more}
Expected: Similar to previous, but error message throws saying this student is already assigned to this course.
-
{ more test cases … }
G.4. Undo deleting a student
-
Undo a command deleting a student that in several courses and having several progresses.
-
Prerequisites: List all courses using the
list-coursecommand. Select to view the course that have student intended to be deleted. -
Test case: (example)
delete-student 16100+undo
Expected Student with ID is deleted and then added back to courses that he enrolled before. Details of the student will be added back to the course. The student is assigned all the assignments in the course. (All of the progresses of the student are restored). Status bar is updated accordingly. -
Test case:
delete-student 0+undu
Expected: No student is added back. Error details shown in the status message. Status bar remains the same. -
Other incorrect undo/redo commands to try:
undo,redo(try these commands immediately after turn on the application) {give more}
Expected: Error throws saying no commands that are redo/undoable. (No CRUD commands used before to undo/redo)
-
G.5. Assign a staff to a course
-
Assign a staff to teach a course.
-
Prerequisites: List all course using the
list-coursecommand. Select to view the course that is supposed to be assigned a Staff. -
Test Case: (Example)
assign tid/16100 cid/55160
Expected ID 16100 of Staff is added into Assigned Staff field of the course and the course ID 55160 is added into Assigned Course field of Staff. Status bar is updated accordingly. -
Test case:
assign tid/17100 cid/55160(Staff ID 17100 level is Admin)
Expected no Staff is assigned to teach the course. Error details show in the status message saying admin Staff cannot teach a course. Status bar remains the same. -
Other incorrect commands to try:
assigna Teacher Staff to a course that already have another teacher assigned {give more}
Expected: no Staff is assigned to teach this course. Error details show in the status message saying a course can only have 1 Staff assigned. Status bar remains the same.
-
{ more test cases … }
G.6. UnAssign a student from a course
-
Unassign a student from a course.
-
Prerequisites: List all course using the
list-coursecommand. Select to view the course that is supposed to be assigned a Staff. -
Test Case: (Example)
unassign sid/16100 cid/55160
Expected ID 16100 of Student is removed from Assigned Students in Course and ID 55160 of Course is removed from Assigned Course in Student. Moreover, all the assignments (progresses) assigned to Student 16100 that belongs to Course 55160 are also removed. Status bar is updated accordingly. -
Test case:
unassign sid/17100 cid/55160(Student 17100 is not enrolled in course 55160)
Expected no student is unassigned from a course. Error details show in the status message saying no such student is assigned to this course. Status bar remains the same. -
Other incorrect commands to try:
unassigna student from a course that does not exist. Error details show in the status message saying cannot find a course with such ID. Status bar remains the same.
-
{ more test cases … }
Appendix H: Effort
Overall, the level of effort required by this project is high due to many factors which I will point out.
The first and most obvious is that, AB3 only deals with one entity type, however, our program deals with 6 entity types. While this is not that impressive by itself since the code base can be copy and pasted to form 6 different yet very, very similar addressbooks, we have refactored AddressBook into AddressBookGeneric<K extends ModelObject> and made it such that AddressBookGeneric can take in any entity which extends from modelObject, thereby saving on a lot of unnecessary work and repeated code. This also makes it immensely simpler for extension of code in the future should we decide to implement other entities.
Secondly, with the increase in the number of AddressBooks, the amount of work for the UI has also increased drastically. Almost every entity except for Progress has it’s own Tab in the UI. Not only that, each page is broken up to 3 different sections, each showing different levels of details which we think is more intuitive for the user. Moreover, we have made it such that for certain commands such as find and list that the UI will automatically change to the Tab that is affected. Furthermore, we have made it such that the user is able to switch between tabs very easily and can even specify certain sections in the tabs that they want to specifically view. A huge portion of work is put into not only beautifying the UI, but also make it work seamlessly with the program while making it intuitive enough for the user to use.
Thirdly, the entity linking aspect is a very tedious and tricky part of the program that the group has put numerous hours into perfecting. In AB3, there is only 1 entity - person. However, in our program, we have up to 6 different entities, 5 of which has relationships to one another. We needed to think of a way to allow different entities to hold references to each other while making sure that there was no circular referencing errors. Hence, we decided to implement an ID to every different entity, except Progress which can be identified by a CompositeID of assignmentID and studentID. This also meant that we needed to implement methods in ModelManager such that we are able to get and set entities via the ID instead of index. Ultimately, we decided to centralize all links around course so as to standardize all linking. Moreover, a lot of work was put into ensuring that the program is in a consistent state at any point in time, meaning that if entity X had entity Y’s ID, Y should have X’s ID as well. There should be no point in time where X had Y’s ID but not vice versa. This also includes maintaining of Progress objects so as to allow for tracking of student’s progress. Every time an assign/unassign/delete command is run we need to keep track of the Progress objects created and destroyed also.
Lastly, the team has attempted to implement Undo and redo for most of our commands. Whilst it is easier to implement for smaller commands such as add and edit, but it is not trivial for bigger commands such as un-assign and delete. In those cases, we ad to implement Managers to ensure that the undo and redo commands are handled successfully. One of the more challenging portions was when undo-ing an unassign command, we needed to put the recently removed Progress objects, which may or may not be done, back into AddressBook. Hence, we needed to implement a way to check for this case as well. Undo and redo really increased the difficulty of the program significantly especially when we need to maintain correct entity linking.
Overall, we felt that our project was sufficiently more complex and more difficult as compared to AB3.