Overview
Code Camp X (CCX) is for those who prefer to use a desktop app to manage the administrative tasks of running a coding camp. More importantly, CCX is optimized for those who prefer to work with a Command Line Interface (CLI) while still having the benefits of a Graphical User Interface (GUI). If you can type fast, CCX can allow you to manage your camp’s administrative tasks faster than traditional GUI apps.
In the document below, the four main features refers to Student, Staff, Course and Finance
Summary of contributions
-
Major enhancement: added initial code base for the four main features
-
Pull requests #46
-
What it does: implemented the major functionality needed for each of the four main features. This includes the fields needed for each features such as ID and course fee amount, Add, Delete, Edit, Clear, Find, List.
-
Justification: This feature improves the product significantly because the initial code base allows us to work on each of our own assigned features with fewer code conflicts.
-
Highlights: This enhancement affects the commands to be added in the future, hence it sets the initial code base needed for future features to be built upon. This implementation is especially challenging, because alternative design implementations need to be considered, and numerous commands are added to the application.
-
-
Major enhancement: added the GUI alone over three iterations
-
Pull requests #45(First iteration), #73(Second iteration), #117(Third iteration)
-
First iteration: added four different tabs to the GUI, displaying Student, Staff, Course and Finance
-
Second iteration: updated the GUI to look like our initial mock-up. Changed color schemes and added Summary Panel
-
Third iteration: revamped the GUI by improving the color schemes further. Added sub-panels in each tab. For example, the Student tab now has an additional selected Student panel, along with a panel showing the list of courses assigned to the student.
-
Justification: This feature improves the product significantly because a user can see clearly the effects of the changes made in the GUI This implementation is especially challenging, because of the amount of effort taken to plan how the GUI should look like, and ensuring that the GUI is suitable for every member of the team.
-
Highlights: This enhancement also supports the clicking of the GUI. For example, the Student bar can be clicked to show the list of course assigned to the student. Every GUI interaction can be be replicated using a CLI command.
-
-
Major enhancement: added assigning commands (which forms the crux of designing our application) for the four main features
-
What it does: allows the assigning of students/teachers/assignments to courses This includes the GUI support mentioned in the previous section. For example, as students can be assigned to a course, each course will have a list of students. This must be supported by the GUI as well, where the course tab will display the list of students assigned to the selected course.
-
Justification: This feature improves the product significantly because assigning of the various items is the most important part of our application. This implementation is especially challenging, as the design implementation needs to be considered carefully due to the large amount of potential one-to-one relationships. After the discussion with the team about the code structure, I implemented the assigning commands.
-
Highlights: This enhancement is tedious, due to the potential of bugs appearing. The design implementation must be considered carefully. For example, when the user deletes an assignment, the assignment should be removed from every course that the assignment is assigned to. Also, the assignment must be removed from every student that is taking a course with this assignment. As can be seen, the user commands will cuase significant changes to the relationships among the four main features, which have to each to notified of the changes made. The GUI must also be updated automatically when the user performs the command, in every tabs.
-
Minor enhancement: added the support of a summary panel which displays the overall statistics of the coding camp
-
Minor enhancement: added a quick navigation command that allows the user to switch between different tabs quickly (Select command and CTRL+UP/DOWN shortcuts)
-
Minor enhancement: added a history command that allows the user to navigate to previous commands using up/down keys.
-
Code contributed: [Functional code]
-
Other contributions:
-
Project management:
-
Managed releases
v1.1,v1.3(2 releases) on GitHub
-
-
Documentation: Claim-Did around 90% of the User Guide. Pull requests #59, #66, #117, #119, #221
-
Bug Fix/Bug Finding. Pull request #117, #207 List of commands tested by me(Checked that it actually saved, undo/redo works for these commands, and whether GUI auto-updates): all add, edit, delete, assign, unassign, find, list, switch, clear-all commands
-
Contributions to the Developer Guide
Given below are sections I contributed to the Developer Guide. They showcase my ability to write technical documentation and the technical depth of my contributions to the project. |
The sections below give more details of each component.
View/UI component [Sim Sheng Xue]

The UI consists of a MainWindow that is made up of parts e.g.CommandBox, ResultDisplay, StatusBarFooter etc.
All these, including the MainWindow, inherit from the abstract UiPart class.
The UI component uses JavaFx UI framework.
The layout of these UI parts are defined in matching .fxml files that are in the src/main/resources/view folder.
The UI component,
-
Executes user commands using the
ViewControllercomponent. -
Listens for changes to
ViewModeldata so that the UI can be updated with the modified data.ListPanelobjects store a list ofCardobjects.
DetailedPanelobjects store a list ofVeryDetailedCardobjects. For example, for the Student Tab:
The StudentListPanel is the top left panel. This stores a list of StudentCard,
which only displays the basic information about the Student.
The StudentDetailedCard is the top right panel. This is viewed when a specific
Student is selected using a command. This will show the detailed information about
the Student, such as the courses assigned to this Student.
The StudentDetailedPanel is the bottom
right panel. This stores a list of CourseVeryDetailedCard.
Each CourseVeryDetailedCard displays the list of assignments assigned
to the Course of this Student.
Only the Student and Course tabs contain DetailedPanel(bottom right panel). All tabs
contain the ListPanel (top left panel) and DetailedCard(top right panel).
This is because ListPanel is needed to show the basic information of each
item, while DetailedCard is needed to show the detailed information of each
selected item. DetailedPanel is only needed for Student to show list of Courses for a Student,
and for Course to show list of Student for a Course.
-
As can be seen from the UI diagram above, each of the
Card,DetailedCardandVeryDetailedCardwill subscribe and listen to theViewModelthrough the logic layers. -
Each of these classes will correspond to the observableMap in
ViewModel -
When there is a change to the model, the
ViewModelwill update its observableMap -
As each of these classes in
Viewsubscribe to theViewModel, the UI will update automatically.
ViewController/Logic component [Sim Sheng Xue]

API :
Logic.java
-
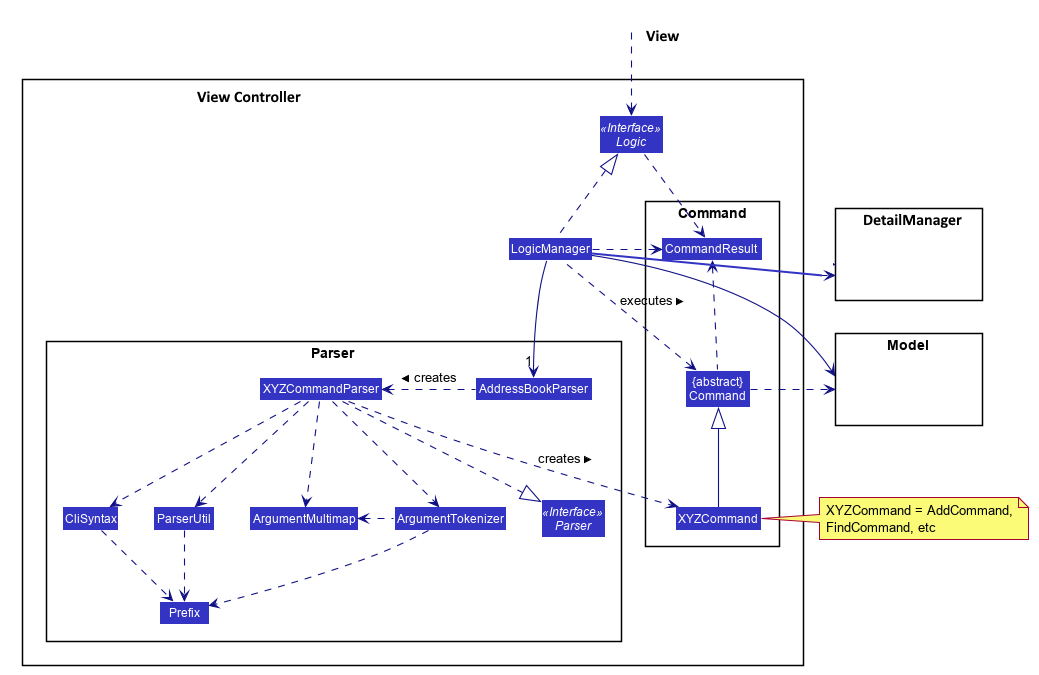
ViewControlleruses theAddressBookParserclass to parse the user command. -
This results in a
Commandobject which is executed by theLogicManager. -
The command execution can affect the
Model(e.g. adding a student). -
The
LogicManagerwill invoke the relevant class located insideModel. For Entity CRUD commands, theModelManagerwill be invoked. For Link CRUD commands, theEdgeManagerwill be invoked. For Progress CRUD commands, theProgressManagerwill be invoked. -
The Managers will post events to the
EventsCenterSingleton. The subscribing managersDetailManagerandStorageManagerwill listen to new publish events in the event bus. TheViewalso subscribes toDetailManager. This allows for the commands executed by theLogicManagerto moify both the View and Storage. -
The result of the command execution is encapsulated as a
CommandResultobject which is passed back to theView. -
In addition, the
CommandResultobject can also instruct theViewto perform certain actions, such as displaying help to the user.
Storage component [Sim Sheng Xue]

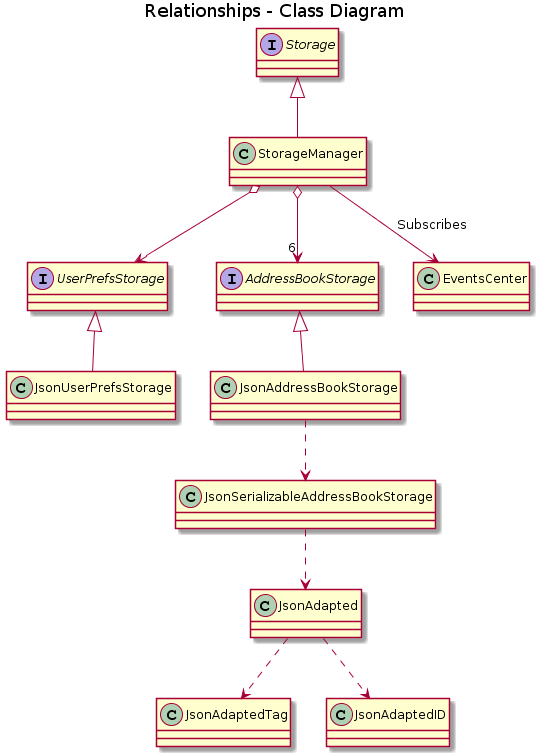
The Storage component,
-
can save
UserPrefobjects in json format and read it back. -
can save the Address Book data in json format and read it back.
-
The
StorageManagersubscribes to theEventCenter. It will listen to both DataStorageChangeEvent and DeleteEntitySyncEvent. DataStorageChangeEvent occurs when basic information about each object is changed, except for deletion. DeleteEntitySyncEvent occurs when an object is deleted, and the storage has to be update to maintain consistency. For example, when a Course is deleted, the DeleteEntitySyncEvent will trigger the storage to remove the Course from every Student assigned to this Course.
Unique Identification of Entities [Sim Sheng Xue]
-
UUID Manager- Ensures ID of all entities are unique, allowing each object to be uniquely identifiable
UUID Manager
-
All ModelObjects have their own ID which is generated by UUID manager
-
For Progress objects, the ID is a composite ID of assignmentID and studentID
Consideration:
Each ModelObjects should have a ID generated that is unique among the entire application, across history.
For example, not only can two Students not have the same ID, but a Student and a Staff cannot have
the same ID. This design consideration is taken due to the existence of Finance.
The Finance object can represent a Student paying for a Course. When the Student is deleted,
the Finance object is not deleted. This is due to the need to track the Finance of the coding camp,
even though the Student has left the camp(and assuming there is no refund, if not the owner
can delete the Finance object).
Hence, this means that if the ID is not unique among deleted objects, there may be inconsistent information located in the Finance objects.
Tracking Miscellaneous Payments/Earnings, Teacher Payments and Student earnings [Sim Sheng Xue]
Implementation

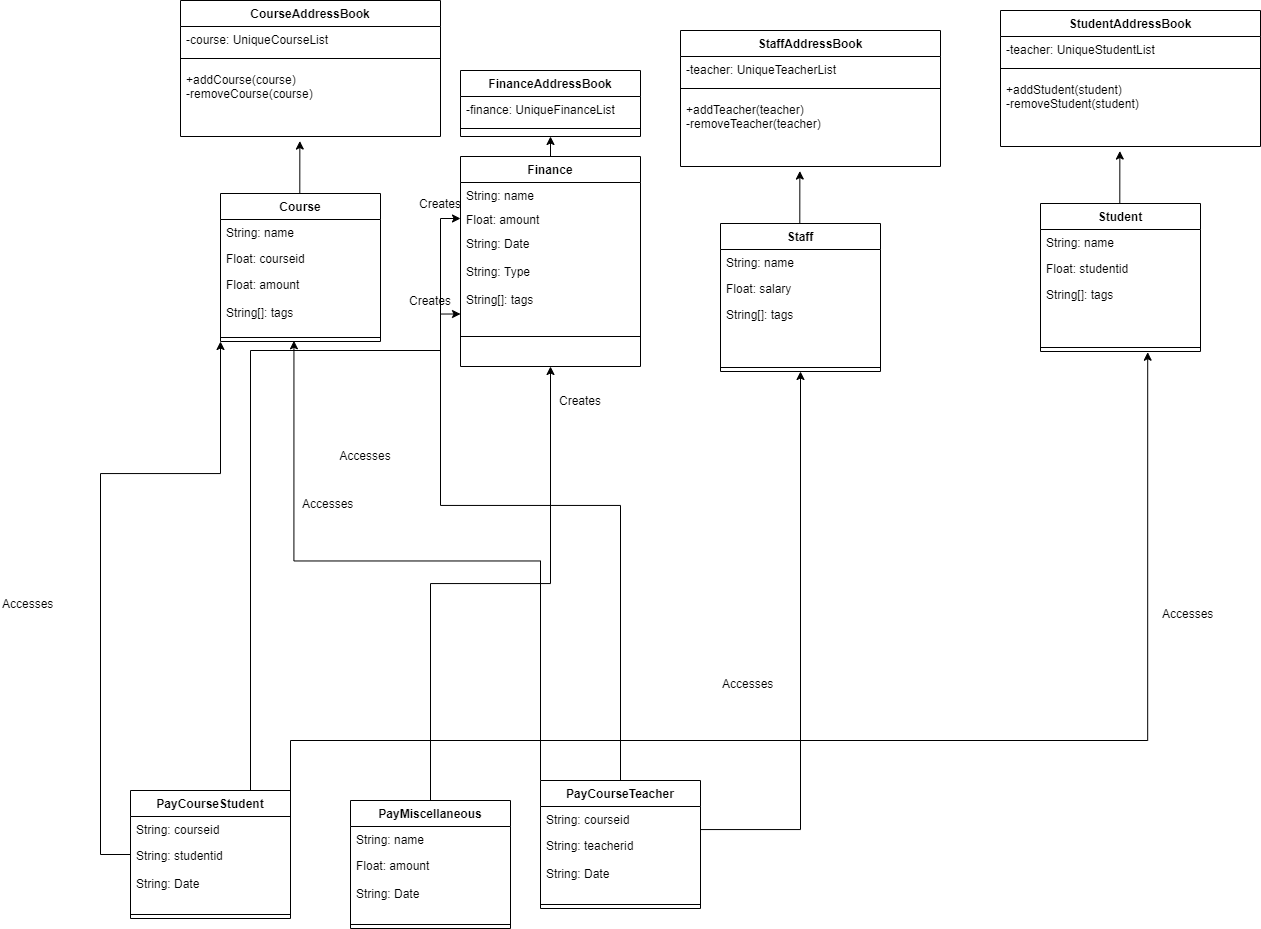
Finance type Miscellaneous or m add command will add a Finance with a given Name (description) from the user.
The amount is sign sensitive, meaning miscellaneous can take in a positive amount or a negative amount corresponding to
earning or expense depending on the user.
Miscellaneous transactions can either be payments or earnings, such as purchases of stationary or advertisement revenue. Teacher payments are tracked by courses, where the teacher is paid for each course taught. Student earnings are also tracked by courses, where the student pays for each course taken.
Finance type Miscellaneous or m will create a Miscellaneous transaction,
where the Amount is specified by the user.
Finance type CourseTeacher or ct add command will access CourseAddressBook and StaffAddressBook to ensure Course and
Staff exist and make sure this staff is teaching this course. The Amount is set to the amount of the Course
(student fee).
Finance type CourseStudent or cs add command will access CourseAddressBook and StudentAddressBook to ensure Course and
Student exist and make sure this student is taking this course. The Amount is set to the amount of the Course
(student fee).
All three Finance types will create a Finance object to store the transaction,
which will be saved in the FinanceAddressBook.
Navigation among command history in the command box [Sim Sheng Xue]

Coding Camp X supports quick navigation among command history in the command box.
Whenever the user executes a command, it will be added to a stack. If the command
fails to execute or is exactly the same as the previous command executed,
it will not be added to the stack.
The user can click the [UP ARROW] or [DOWN ARROW] keys in the command box to navigate through the executed command history. Since the implementation for [UP ARROW] is similar(as seen in the activity diagram), this guide will explain [DOWN ARROW] in details.
When the user clicks the [DOWN ARROW], the application will check
if the Right Stack is empty. If the Right Stack is empty, this means
that there is no commands below to navigate to. In this case, the command
box will still show the initial command.(No change)
Else if the Right Stack is not empty, the next command will be popped from the top of the Right Stack. Now, two actions will occur in parallel. The command will be added to the Left Stack, and this command will also be shown in the command box. This allows the user to navigate back to the command after with an [UP ARROW] key command. The process will then come to an end.
Contributions to the User Guide
Given below are sections I contributed to the User Guide. Claim: I did around 90% of the entire user guide. Due to the page limit, I will only show the command summary table. They showcase my ability to write documentation targeting end-users. |
Command Summary
| Section | Command | Format | Example |
|---|---|---|---|
Help |
Help |
|
|
Undo/Redo |
Undo an undoable command |
|
|
Redo a redoable command |
|
|
|
Select item |
Select a Student |
|
|
Select a Staff |
|
|
|
Select a Course |
|
|
|
Select Assignment belonging to the Course of a Student: |
|
|
|
Select Assignment belonging to the Student of a Course: |
|
|
|
Switch tab |
Switch to Summary Tab |
|
|
Switch to Student Tab |
|
|
|
Switch to Staff Tab |
|
|
|
Switch to Course Tab |
|
|
|
Switch to Finance Tab |
|
|
|
Switch to Assignment Tab |
|
|
|
Assigning to Course |
Assign Student to a Course |
|
|
Assign Teacher to a Course |
|
|
|
Assign Assignment to a Course |
|
|
|
Unassign Student from a Course |
|
|
|
Unassign Teacher from a Course |
|
|
|
Unassign Assignment from a Course |
|
|
|
Student Commands |
Add Student |
|
|
Delete Student |
|
|
|
Find Student |
|
|
|
List Student |
|
|
|
Edit Student |
|
|
|
Teacher Commands |
Add Teacher |
|
|
Delete Teacher |
|
|
|
Find Teacher |
|
|
|
List Teacher |
|
|
|
Edit Teacher |
|
|
|
Course Commands |
Add Course |
|
|
Delete Course |
|
|
|
Find Course |
|
|
|
List Course |
|
|
|
Edit Course |
|
|
|
Finance Commands |
Add Finance Type 1 (ft/m) |
|
|
Add Finance Type 2 (ft/cs) |
|
|
|
Add Finance Type 3 (ft/ct) |
|
|
|
Delete Finance |
|
|
|
Find Finance |
|
|
|
List Finance |
|
|
|
Calculate Earnings |
|
|
|
Calculate Expenses |
|
|